©Verte Photography All Rights Reserved

Showing posts with label verte photo. Show all posts

Wednesday, April 10, 2013

Product Composition

Composition: The placement or arrangement of visual elements or ingredients in a work of art.

In photography there are a lot of general composition rules.  I covered some of these in our Photography 101 series back in January. Many of them will still apply to product photography. I thought in order to keep us well rounded I should touch on this as part of our placement and perspective discussion this week... because composition and perspective really are interlinked.  In fact, Perspective is the name of one very popular style of composition!


Perspective: The angle at which you shoot your subject. We ended yesterday talking about this... you want your camera to be in line with your product, not off to a side, or higher or lower then your product.


Correct Camera height.


Shot with camera directly in front of product


But if you have jewelry or other items you need to shoot flat.. then you may need to shoot directly DOWN on your item.  I don't suggest it, but I know sometimes you have to. I suggest busting out a step ladder and leaning over your workspace. Be careful not to get in front of any lighting source!

Shooting Down at product. / Product provided by Sweetsies

Fill the Frame. Our second composition rule tells us simple what to do... rather then leaving a lot of extra space around your product, get closer and fill the frame with your item! This will provide better details as well as simply "looking nicer"
Too Far Away.


Full Frame / Product Provided by: Streeter & Co

Tip: If you have a high resolution camera, but can't focus close enough to your product you can crop in! Be sure to read up on the best way to do that, and keep your image looking sharp!


WIDE/TALL: If your product is wider then it is tall shoot horizontally, more tall then wide, shoot vertically.


More Wide = Horizontal Image / Product by: L.W. Hooks
Taller then Wide. Gift Unknown vendor.

Tip: This may also depend on where your images are going! If your uploading to a online shop, your thumbnail images may be more square, be sure to learn about any dimensional restrictions you may have before shooting!

Show the DETAILS. I don't mean just crop in on the same image... but I like to see DETAILS when I shop online. I want to see the different beads, the chain, the clasp... give me DETAILS.

Product Provided by: Streeter & CO


Product Provided by: Crafty Gal Creations

Product Provided by: Crafty Gal Creations


Tuesday, April 9, 2013

Product Placement and Posing

I know, crazy me... talking about posing inanimate objects... but it is true! I spend more time placing an item then I do shooting it. There is a lot of thought and attention to detail needed to showcase an image! In commercial photography they don't really call it "posing" they call it "styling".

Lets talk about some of the most popular items
  1.  Jewelry
  2. Crochet and Knit items
  3. Stitched and Sewn
  4. Reflective and Clear (this could be jewelry, but we will use jars and tins for our example)

Jewelry, Reflective and Clear items. By far the most time consuming of all the items I shoot. So why is that? Let's go step by step.
  • I sort all the product, like items together, with similar styles and colors grouped up also. This allows me to look at a glace at what I have and select the best backgrounds for each.
  • I put on anti static gloves. I don't want to leave fingerprints, or extra hairs or dust on anything.
  • I clean each item with a soft cloth.
  • I check them for stray hairs, or fibers that often get stuck in chains (esp if they are shipped to me on top of cotton packing like this:
Product and Packaging provided by: Crafty Gal Creations

I suggest putting items in plastic or wrapping them in tissue to reduce the fibers that attach themselves! 
  • I set my studio, with the tools I will need, backgrounds, props, etc.  I also set up lights, and test everything to insure quality. 
  • Now I am ready to get started to shoot!

 Crochet, knit, and sewn items: While most of the steps above apply, I don't have to typically worry about fingerprints on these items. However, I do have to spend extra time checking the stitching, hems, materials for stains, or yarn changes or errors that I try not to highlight in the image. Overall the biggest thing is making sure there are no extra pet hairs, fibers or strings or yarn hanging off. Because you want to be able to shoot detail shots of all fabrics, hooks, clasps, buttons, stitching and etc.

Once I am ready to shoot - it is all about how to "pose" the product and placement on the background itself. You know from previous posts that the more space you leave between your product and the background, the more blurry, or out of focus your background will look when you use your macro, flower, or aperture controls. It may also help you reduce shadows depending on your lighting situation.
Below are my tips for successful posing and placement.

Placement: I like to center my products on the background, and depending on product leave anywhere from 6 inches to 4 feet to the vertical portion of my background. The larger the item, the more space I leave. (also, the more likely I am to use additional lighting so the vertical background doesn't get underexposed due to lack of light... I want it all to look seamless, and consistent.)

 There is nothing wrong with the above image, you can see the product. However, the light on the props and the twisted hook on the earing give it a little bit of a haphazard look... combined with the horizon being off and the opposing agle of product and it just doesn't feel pleasant to look at. (Granted, I did have to crop and twist to make this point I did originally shoot the horizon straight)


Posing: Looking at how you are placing your items makes a big difference. You can create something that is a good photography, but doesn't really display your item, or worse, if done in a sloppy manner you can give your clients the impression that photographs are an after thought, or that you don't take care with your products. Ouch! By putting thought into them, you can go from good to captivating with ease.
Product Provide by: Crafty Gal Creations
 There is nothing wrong with the above image, you can see the product. However, the light on the props and the twisted hook on the earing give it a little bit of a haphazard look... combined with the horizon being off and the opposing agle of product and it just doesn't feel pleasant to look at. (Granted, I did have to crop and twist to make this point I did originally shoot the horizon straight)

 However, by sliding the earnings to a hanging position over the sound hole (yes, I looked up the name of the hole on a guitar and thats what it said it was... who knew) The hooks are showcased better, the image is less distracting and your product becomes the focus. It's a simple change. 

Consistent: I also find that when I am shooting the SAME item or items that are the same size, it behooves me to set my camera on a tripod, and place the items in the same spot. so the item is a consistent size shot after shot. Because you don't want to end up with this kind of a difference.


Product and Packaging provided by: Crafty Gal Creations

Product and Packaging provided by: Crafty Gal Creations


 Tripod: A tripod is your friend. It will keep your camera in one place for consistency. If you shoot the same size over and over again, make a note of the zoom, and where products are on the background, and your tripod (mark them with tape or marker if you can) then you can recreate this anytime you need!

Camera Placement: Place your camera to the height of your product, and directly in front of it, not at your eye level. This will allow you to keep your horizon line straight, rather then making your products appear to be tipped or slanted, which makes your image look sloppy and less appealing.

Product appears to be sliding off  image due to horizon line and angle.
Twisted Product Sample Image / Product Provided by: Streeter & Co
 
Nice, straight on clean image.
Take your Time: Especially when working with beaded items, chains and stones, you need to take your time. I have a little rolling stool.. yep just like the doctors office. I roll in sit down and bust out my tweezers and other small tools so that I can easily turn, flip and place each small item. In the end, details sell.  Even if your not placing each bead just so... making sure your product is straight and your camera is lined up will make a dramatic difference.


Friday, March 1, 2013

Not "that photographer"

I recently had a fellow business owner send me her thanks for helping her with her own product photography... and she commented that she was really happy that I wasn't "that photographer".
It really made me smile.

Your right! I am not.

There are a lot of ways that I am not that photographer... and I thought I would share a my list of 10 things about myself and my business that set me apart!

  1. I don't judge your photography skills
  2. I don't claim to be the "end all be all" to photography
  3. I SHARE my knowlage, I WANT to help
  4. I don't believe equipment is everything
  5. I believe in client's privacy and I don't share even a 1/3 of the work I do
  6. I don't ever want COST to be the reason why someone doesn't have great images! Personally or for their products. Everyone deserves to have amazing images.
  7. I am old school and believe "It's not a print until you can hold it in your hand"
  8. I do a lot of charity work
  9. I support women, local, and small businesses 
  10. I focus on being green. Recycling, re-purposing and purchasing from companies with a "green focus". 

 I have spent several days... well weeks really, in the past few months working with other business owners who don't have products that could be shipped or who are choosing at this time not to send products to me for other reasons, mostly because they do mostly custom items. I have been troubleshooting and offering my advice free to them to improve their home studio set up, and camera skills to be able to get the "best" available images, working with what they have.

This month was sort of a toss up for me when I made my plan for the year... so I have decided I will focus on macro and product photography this month since it seems so many people out there REALLY need this help! I hope to share some tips, techniques and camera functions to help you achieve better images on your own.

This does not in any way mean I couldn't use your support, or business! I would LOVE to help you with your imaging needs!  Like I said before - don't let cost be the reason you don't have good images! I have several deals available, I offer trade for services in many cases... and I will do my best to work with YOUR budget without sacrificing your needs!

 In fact, I will offer the first 3 people to email me at VertePhoto at Gmail dot Com a FREE 1 box shoot! What ever you want to send 1 time only.. you only pay the shipping. Everything will get the full treatment... multiple photos of each item, digital preview and watermarking with your logo or website... full photo release and a special surprise item to be returned with your products! My march madness gift to you!

 I don't know anyone else who offers FREE product images! But hey... I am not "that" photographer !


Monday, February 25, 2013

Top 5 Things you can do for great Wedding Portraits

Even if you have hired a professional photographer, and followed all my other advice from this months (Love posts), there are still a few things you can do on the day of your wedding to have a dramatic impact on your images!

In my 20 some odd years of being in the photography industry I have done countless wedding, bridal and event photography. In that time I have been able to be a part of all stages, from assisting, to being the “main” photographer, to editing, creating video, and even printing the end product. In that time I have really learned to appreciate the art behind wedding photography.

 Did you know as a bride, attendant or even a guest there are countless things you can do to help a photographer and insure the images that are captured are priceless keepsakes for generations? Here are my top 5 ways of insuring great wedding portraiture!

#1 The Shoot List.
First as a couple, be sure to create a “shoot list” with your photographer. This list is the combo of shots you need it should look something like…
Bride/groom
Bride/ Groom / Grooms mom (Anne)
Bride/ Groom/ Grooms mom / Step Dad (Frank)

This list should be done in advance and copies should be on both you and the photographer’s side. A real wedding photographer will have the basics memorized- but as in many modern families there are people you want in, people who may need to be on the end to be edited out later (you laugh but we all know its true!) and even ex’s who cant be stood next to each other. The more information you can give ahead of time for these little notes, as well as the REALLY important shots you want. Like… if you HAVE to have a photo of great-great grandma and the newborn… you should speak up prior to the chaos.

#2 The Assistant
Any wedding photographer worth their salt will not be doing this solo and the shoot list will be the assistants guide to make sure everything the bride want gets done. He/ she is the backbone so to speak, and the backup. They are also the “go to” in most photographer / assistant relationships. The photographer is there for the bride. The assistant is there for everyone else. If your mom wants a shot of something, she should be told to go to the assistant with it. The assistant will either take the shot (if they are a second shooter) or will be sure to have the photographer do it. Or will at the very least be able to handle the situation without distracting the photographer away from the bride. You should clarify the role of the assistant or additional shooters in your pre-wedding consultation you’re your photographer before the wedding, and be sure to inform your bridal party… and vocal family members whom they can and cannot go to with requests.

If there is no assistant (or even if there is) you should also assign Aunt Betty (who always wants to help, and knows most everyone… you know the one.. ) to assist the assistant. Or, better yet find one from each side of the family, give them a copy of the shoot list, and let her be the runner during the bridal portraits. This can save a lot of time! The photographer or photographers assistant can say who they will need next, and she can go get them. She can also watch to make sure each combo you need is getting done… because trust me – you wont know! It also makes her feel important and keeps her from going to you with everything she thinks needs done.

#3 The Kit
I highly recommend this kit to every bride. Go to the dollar section of your local drug store or big box market and pick up these handy items.


  1.  A small sewing kit (includes tiny scissors, thread and needle, add safety pins and several boutineer pins (craft needles) to it if needed)
  2.  A pack of Mary-Kay blot cloths ($5) or some round cotton pads (dollar section) to blot shiny areas during the day- don’t forget to use them on you and your groom!
  3.  Extra lip gloss /lipstick, powder and WATERPROOF mascara
  4.  Nail file, clippers, and basic polish – you know one of your bridesmaids are going to need this.
  5.  I also recommend Tylenol, Advil, Tums, and a Powerbar.

Now the tricky part to this kit is making sure you have it with out – ALL the time. I suggest you give it to your maid of honor and put her in charge of making sure you touch up makeup and blot about every half hour. (or before each “stage” of the day at least) I have seen these kits cleverly attached to bouquets or as a cute handbag to carry all day.

#4 The Smile
Everyone should be forewarned that especially in today’s technologically crazed world, it is best to assume someone; somewhere is taking your photo, especially on your wedding day. Everyone should keep good smiles, and shoulders back, sit up straight etc… all day. Nothing looks worse in your church shots then the one bridesmaid or groomsman that is hunched over, or picking their teeth. While your photographer can (and should) do something about this in your formal shots, during the ceremony there is nothing they can do! As a bride and groom, you should always have a smile… remember to excuse yourself to the restroom to pat your underarms dry, checking for food in your teeth, or touching up make-up.

 Last… PLEASE remember a wedding is no place for gum! Your photographer will thank you for not making them edit out bright blue gum from open mouths! Fact: Some will charge you extra for it, and they should!!!

#5 Go the extra mile.
Professional wedding photographers all have a different view on the next subject. But most I know agree. If you are having a buffet, or sit down dinner it is not a good time to be doing photos. NO ONE likes having those table shots done, food in teeth and all! It is a good time to let your photographer breath, sit down, swap batteries, or reset gear for the party portion to come. Discuss in advance what your photographer typically does during this time. It is the polite thing to include your photographer (and crew) in on the meal. Some photographers will flat out refuse, while others may tell you they may take a small portion in to the kitchen area or somewhere away from guests, some may outright thank you for being so generous, and some may be even be expecting it! I find that the longer you expect them to produce amazing images, the more you should expect to feed them! This also is a nice way of thanking them for everything they are doing! Yes, they are paid to be there, but if they pass out from lack of food or dehydration think of all that equipment they are likely to break… and moments they will miss as they are carted away in an ambulance!
Found on the Wedding Bee


Tip: If you want a shoot of everyone who attended your wedding, rather then doing table shots ask for a photobooth, or photoguest book option. Or even set up an "upload" station with a laptop or cards to where they can send their own snaps of your wedding to you!
I hope these tips come in handy! I know my past brides and friends have always appreciated them!

Wednesday, February 13, 2013

The Photographer Search pt.2

Now you know where to look... but other then price and style what should you be looking FOR in a photographer... Here is my list of things to look for or ask before meeting with the top candidates.

Most of these questions can be answered by viewing someones website. If you don't see the answer, or it's not clear, or up to your standards either move on to the next, or if it's not a deal breaker for you then ask for clarification or explanation on the phone prior to meeting. If your mind is at ease, and you like the style and price THEN put them on the short list of photographers to meet with! Remember, you want that list to be around 3. 

1. Stability. 
  •  Look how long they have been doing weddings?
  • How long they have been in business?
  • Do they work Full Time as a photographer? 
  • Do they have a studio location?
2. Price and Service.
  • Are they in your budget?
  • Does the portfolio fit your style? Can you imagine those images hanging on your walls?
  •  What is included in the package?
This is where I am going to put in my 2 cents... many people will want the photographer to hand over a disk of images, maybe even unedited images because they have Photoshop experience. Don't fall into the trap of discounting a photographer because they wont offer you that. First, understand digital files (unwatermarked) are basically like negatives as far as copyright laws stand. A photographer makes money based on sales, its retail as much as it is a service industry. So first, if they hand you a disk they know they wont see you again. But more importantly, photographers have a certain pride in their work as artists... handing over a disk, especially an unedited disk would be akin to a painter drawing a paint by numbers - without giving you the number code and dumping paints in your lap. It's not a finished product, and they wont give you a price break for saving them the work.

Is this true of everyone, no. I in fact sell disks of my images. However, even the "unedited" images have been touched in some way. I don't give RAW images, ever. Every image of mine is "processed" through Photoshop, in what I call my "editing" process. That doesn't mean that I am whitening teeth, or fixing out of place hairs... it means I am choosing the "best of images" tossing the accidentals, and ones I knew were bad as soon as I took them... and doing what I do to provide you with the best images I can. I offer all my clients the right to purchase a disk with a photo release so you can print your own images, or use in shops and online if it is product or commercial images. I choose to do this not because I don't want to see you again, but in truth I don't like shipping prints nor do I have the time to hand deliver them anymore. Quiet frankly I find constantly pulling out images 3 months, or a year later to print 1 or 2 images a huge pain and super time consuming... so for me, it simply makes sense to offer a disk. In addition, I offer clients what most would classify as "editing" as a retouching service. This allows me to fix the teeth, hair, and do creative edits if you want me to spend extra time on that... at your request.  I can charge you per image, or for everything, but I charge extra for that work.

Because every photographer is different in this way, it is VERY important to clarify what they mean, and include when they say "editing". Just as it is when they say they give you a "disk" of images... does that mean you get a release to print and share also, are they watermarked... etc. I will cover more of this in the contract details.. dont miss that!

3. Registered business
  • Are they registered as a business with the state? You can ask to see a business license, ask for the number, or go to your states official small business website and typically search there for the name. 
  • Are they registered with PPA, WPPA, or other photography groups? This just goes towards how serious they are... are they respected by peers, well known in the community? Don't discount someone because they are not members, I know many great photographers who are not. But you may ask them why they are not.
  • Do they have insurance? Not just on their gear, but what if they damage something at the location? When I was doing time as an assistant the photographer I was with took a large backdrop up an escalator for a commercial gig... and it punched a hole in the ceiling. oops. 
4. Equipment / Assistance

  • What kind of  equipment do they own? ( I suggest looking for professional grade slr equipment multiple flashes, lenses... this would be someone serious about guaranteeing quality for your day)
  • Do they have back up gear, what is that?
  • Do they have an assistant, or a second shooter? ( the difference being an assistant, helps.. carries things, holds reflectors etc. A second shooter does additional photography when they are not helping the photographer and doubles your chances or gives two perspectives of events like the bouquet toss... one photographer could capture your face - the other the bridesmaids)
  • Is the second shooter always the same? Many photographers don't have an official "go to second" but I think if you are going to have them shoot - you should be able to see THEIR work as well as the main photographer! (interview both if possible!)
5.  Turn around time.
  • When do you get to see your proofs? 
  • Are they printed or digital proofs
  • If digital, do you have a private gallery online that you can share with friends and family?
  • Are they posted to Facebook or a blog for public viewing? (personally I am not a fan of that... for privacy reasons)
  • How long before you see the finished product?

This should give you solid information to make a short list of photographers. Keep in mind, while some of it should be very openly displayed on the website, if it's not.... ask! Don't call a studio or office and expect to be able to ask them all of this just on a random call, however. Photographers don't make money sitting around answering phones! Be respectful of their time, tell them your a bride or groom looking for additional information and you would like to ask them a slew of questions prior to possibly meeting, ask if they will schedule a phone meeting with you, or if they have 15-20 minutes to answer your questions now.  That respect will go a long way! Also, they may have an assistant or office manager answering phones... don't feel like you have to talk to the photographer only... its a good chance to get an inside look at the dynamics of the team. If they have time and the answers you need you might get more information from them!


Tuesday, February 12, 2013

Starting the Photographer Search

It really doesn't matter if your searching for a family photographer, commercial, or even wedding photographer there is a vast number to choose from and many different places to find them!

The Referral: First, look for a friend who has had a similar need, in our case someone who has gotten married in the past year or so. Ask, if they were happy with the service, quality, and if they could have changed anything what would that be? Look at their images.. they could be LOVELY but just not your "style". If you find a good referral but they are out of budget, or not really the style that your looking for, ask for a referral from THEM and let them know why. Photographers tend to know other photographers in different price ranges, styles, as well as others similar to them in case they are booked the day you need!

Also, ask other wedding vendors that you have already chosen... ask at the bridal salon, DJ, Cake maker... in many cases they will know or have cards on-hand even if they don't have first hand experience of the service.

Check the online ads: There are TONS of websites that list wedding services. Most the photographer has to pay to be a part of... but show sample portfolios and sometimes offer client reviews like SnapKnot , The Knot, Wedding Photography Select and One Wed.

I personally like The Wedding Wire you can not only review clients ratings and comments, but you can talk to other brides online in the forums! Super awesome for ideas and getting more information!

A great place to check also is PPA (Professional Photographers of America)  which lists a data base of its members. PPA offers education, certifications and hosts trade-shows for photographers. While not all awesome photographers are members, its a great place to look for a serious professional! Another great option is WPPI (Wedding Portrait Photographers International) being more specific you wont have commercial or landscape photographers clouding up the listings. Plus its a great start if your planning a destination wedding!

If your style lends towards photo-journalistic there is a site for that too! The Wedding Photojournalisic Association (WPJA) Links you directly to their members in your area. Founded in 2002 it is a "newb" in the world of Photo Associations, but they have some amazing inspirational images and solid reviews of their members! 

The Budget Finds: Many "good deals" can be found for someone starting out and working to build a portfolio... keep in mind you still want someone who will be professional with your guests, you wont find them at the bar, and trustworthy! You WANT to be able to find them after and get the images! You also want there to be quality images! Rather then trusting your images to little Bobby who has a camera and took photography in high school, check the local Art Institute, or Collage in your area with a Photography program. Go to the TEACHER and ask who they would recommend! Also, checking with local studio photographers who have / or have had interns, or might be going into that direction themselves is a really good bet! Please be careful tho, not every landscape photographer or portrait photographer can do an equally good job for you at your wedding!

Now... many people will suggest places like Craigslist - where you can place an ad or review ads... like classifieds. Since this is free for both... your basically opening yourself up to any number of scary situations, not just "have point and shoot and want to do weddings" but scammers, and other crazy people alike. There are too many other good places to search for me to ever recommend this... but if you do... make sure they have a website, client referrals and clients you can call to talk to, and ALWAYS meet in a public place, and NEVER meet anyone alone. (ok, mom rant over)


Google does a good job of finding photographers with websites or blogs in most areas, so you can do that as well just to get some names to look into! Before I go on to talk to you about the meeting, we are going to talk a little about research and questions to ask before you set a meeting. This will help you select your "top candidates" as well as not waste multiple photographers (and your) time by meeting with more then three.

I hope you keep coming back to check in as we continue our month of LOVE!

Friday, February 8, 2013

Friday and I'm in Love


I don't care if Monday's blue
Tuesday's gray and Wednesday too
Thursday I don't care about you
It's Friday, I'm in love
-The Cure


Since this month is all about love... I thought I would share a few things that I love! Enjoy!


Babies, crying, sleeping, smiling.... it doesn't really matter!


Crazy Funky designs and fabrics


Lip Butter from Streeter & CO


Lilacs, lavender and all things French


Wednesday, February 6, 2013

Wedding Photography Sessions Explained!

Since February is the month of love I thought I would spend some time talking about wedding, and couple photography! Today, I want to share with you some "hot" terms that you will be seeing as you start shopping for wedding photographers!

First, what kind of photography are you wanting? You should sit down and decide how much of your wedding photography budget should be spent on "other" sessions! Or, decide if other sessions can be budgeted out of your every day account! Here are some additional sessions, some photographers include in packages with your Wedding Day, some offer in addition, and some you will have to find someone else to do entirely depending on your photographer choices. Not every wedding photographer does, or should do it all!

 Different kinds of photography sessions:

Engagement Session: In this photo session photographers typically highlight  the couple’s personality. Locations can vary from the photographer’s studio to popular tourist spots in their hometown, back yards, or a special location that sets the tone.  The dress is  more casual than other wedding-related photo sessions. While the engagement sessions have been used for newspaper announcements, photo-wedding invitations and the popular photo guest book in the past, many are now choosing to use this photo-op to do "save the date" images. You can do an engagement session at any time during your engagement, and for any end purpose. It is a really good idea to schedule this session with your photographer for your wedding since it will give you a good idea of how well your personalities and styles work together. If you don't have a good experience with this session you may want to consider a different photographer for your wedding!

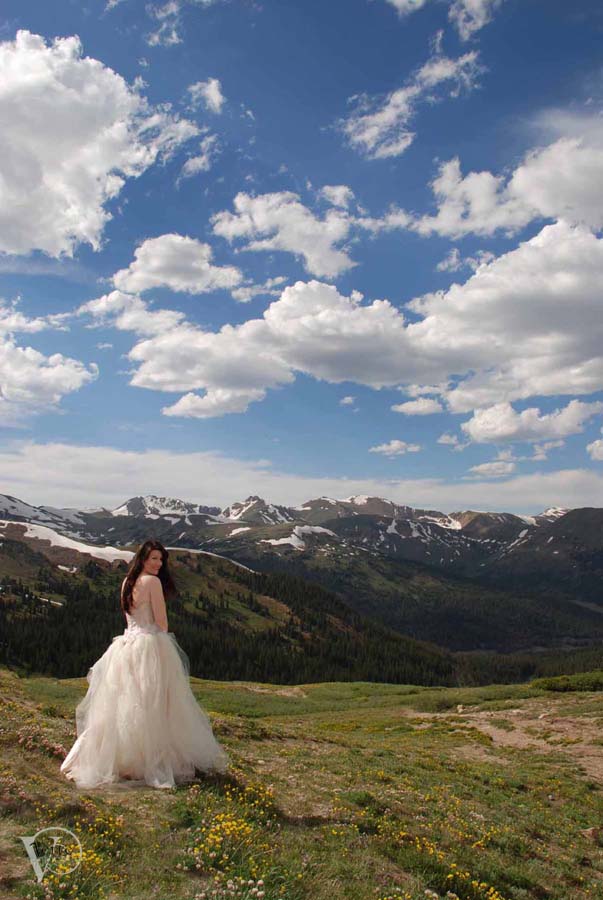
Bridal Portraits:  In this formal affair it is ALL about the dress. While this is typically done in a studio setting, some brides may opt for a 'clean" outdoor scene as well. While the formal name leans towards tradition it is perfectly acceptable to have some fun with it as well! For brides who want tons of pictures of their PERFECT gown that was chosen after careful and laborious consideration, this is a non-negotiable. This is also very popular with traditional brides, and traditional parents!


©Verte Photography / Image of Theresa J. of Theresa J Photography.com


The Wedding Day: You will want to be sure your contract includes times and addresses of where your photographer will be, and exactly what will be covered on this day.
Pre-Ceremony: This is everything that happens prior to the ceremony itself. Be specific in your needs here. It can include the bride getting hair and make up done, getting into the dress, to informal shots with attendants and family, for large weddings I have even suggested doing all the formal shots of the bride and groom separately that can be done, so any formals done after would include them both. Of course some couples will even see each other prior allowing all the formal shots to be done prior.
Ceremony: These are the images taken during the ceremony itself. You should check with your church or venue for rules regarding flash, and access the photographer will have.
©Verte Photography

Formals Bridal Party and Family: Even if your a non-traditional bride, you will find yourself doing some sort of images with your bridal party, and family members. The poses and scene will set the tone for how formal these images come out, but I suggest you do some just for the traditional family members and keepsake images.
©Verte Photography

Informal Portraits: These would be the crazy fun images, more for the bride and groom they can include anyone they wish, but it is kept low key and less posed (or at least less formally posed).


Reception Images: This is pretty much anything that happens at the reception. Typically I suggest the standard cake, toasts, first dance, etc... and maybe an hour or so of dancing... it is not necessary to have your photographer there for the "whole" party, one dancing shot looks much like the other. However, it depends on your day and if you have a "big send off" planned, how long the reception is etc.

Photo Booth: This is a HOT gig right now. Many people are using photo-booths as entertainment for guests, others are using it to put together a photo guest book. Some photographers will offer this as part of their service, some wont allow it at all. You really need to check with them if you are thinking this will be an option for you!

Day After: Shot the “day after” the wedding (although some are after the honeymoon) this is a great time saver if you don’t want to spend the majority of the wedding day taking pictures.  The bride and the groom are more relaxed, and it shows! This can be done at a family brunch, or for more casual family or private couple images. The "newest" trend is to do them as sexy, boudoir style images in a hotel room, just for the couple to enjoy.

Trash the Dress: Another type of day after session.  This varies from aggressive “trashing” with brides engaging in paintball or mud wrestling, to the more genteel trashing of walking through ocean surf or swimming in a lake. Since today it is becoming increasingly uncommon to pass a dress from generation to generation, this lets the bride have "one more day" in it and do something unexpected.

Boudoir: Typically this is just of the bride who wants to give her husband-to-be something private to commemorate the occasion, or even to celebrate the first Valentines day or Christmas together.

Additional Event Photography: Many couples want the wedding events captured with equal skill and talent as their wedding portraits.  While most photographers do not include these optional type of photo sessions, most photographers can and will  cover bridal showers, wedding rehearsal dinners, bachelor parties, etc.


It is really up to you to figure out what style, and how many sessions you will want. Work with your photographer, if they will be doing multiple sessions for you. Some will include an engagement shoot, or if you don't want that, they may offer a holiday session, or 1 yr anniversary session or something else instead!

You really have to balance your budget, with all the cool ideas and everything you want!

Monday, February 4, 2013

Photography Styles

Today you have more choices then ever before for "types" of photographers... how do you chose? So many times I have brides approach me and simply want to book for their wedding or event... and I have to slow them down and really make sure they know "my style".

It's really hard with people pinning ideas for photography images, and then expecting any photographer to recreate that moment. Let's forget the differences in equipment, knowlage, location, and everything else... just the difference in shooting style can dramatically effect how your images turn out.

So how do you know what "style" of photographer you should be looking for? Let's look at some of the popular words photographers use to describe themselves and then you can sort by what style your eye is most drawn to!

Traditional Portrait: (Classic style) This typically referrals to a more formal and posed images. Straight forward, well composed, beautifully exposed, and simple images with a focus on the people. This can refer to any location and is common with many  photographers. This photographer is typically on top of posing, adjusting hair, placing hands... very much at the forefront of the action directing each shot. While older generations will be more comfortable with this style, some modern brides feel it makes them look stiff and uninteresting. The trick is to find a photographer that you enjoy so you will remain relaxed even in a "posed" session.. this will lead to great traditional images!


Contemporary Portraiture: Much more relaxed and lends towards less formal images, this style can result in more spontaneous images. Capturing the spirit of fun, while still incorporating formal elements. The photographer may be less involved in every moment, allowing your personalities and interactions to shine, however they may still set up some shots, or adjust details as needed to improve the overall image. This photographer will tend to seek out unique locations, or angles in which to set apart your wedding from others. 


Documentary / Journalistic Style: In the classical sense, this style is completely hands off. It is a direct record of your day, typically without any posed images, or real input from your  photographer. A sort of fly-on-the-wall approach, where the photographer blends into the crowd and simply records the events.  


This can also be described as candid photography... but candid simply means informal, un-posed and most photographers utilize candid images for reception shots, so be sure to clarify if "candid photography" is mentioned!

This style can also be referred to when people think of images that take great care to take advantage of aperture controls to blur backgrounds, and add interest to images by having greater control over the camera. You will need to see the photographer's work to know WHICH he is really describing,  with this term, as they can produce drastically different results. 


Artistic: I am not personally a fan of this description, it seems to be used as a "catch all" however, when used "properly" this term implies individualism of the artist or photographer. Depending on photographer this may require a great deal of intervention, or none. It may be heavily altered images by Photoshop, or it could be entirely produced by camera, filters etc. You simply wont know what this term is implying without viewing the portfolio of this photographer. Please do your research here!


Glamour or Fashion Photography: This is more of a type of photography then a description of a style, but we are seeing it used more and more often as a description for  modern wedding images where the images have the look of a fashion magazine or what you would think of as a model being posed. Typically a lot of attention to detail, along with lighting is given priority to comfort


 .    
Many photographers will describe themselves somewhere along these lines, or within combinations of these.... some come up with their own "labels", but for the most part everyone will fall in one of these categories or a combination of them.

Professional wedding photographers views their work as art, and the only way to know if you enjoy that style is to read the descriptions and view the portfolios. Keep in mind a portfolio is representative of "the best of" from that photographer, not "every shot".  It is perfectly acceptable to ask a photographer to show you a sample wedding, cover to cover so to speak so you can see their style from start to finish of the same day.

Regardless of if you are looking for a commercial photographer, Wedding photographer, or family photographer... I hope understanding these basic descriptions helps you weed through some of the multitudes of choices you have! 
 .


Friday, February 1, 2013

Love is in the air

What better way to celebrate love then to talk wedding and couple photography this month!

I know, right! 


This month you can look forward to loads of tips about finding great wedding photographers, finding the right one for you, WHERE to find them, what to ask... OH and some of the secrets behind the success, of course! I will be answering some popular bridal questions in our first QandA post... as well as offering some other fantastic tips for doing your own couple images as well! As a special treat, you might also enjoy a few love stories along the way!


If you joined us in January you know I pumped it FULL of tech tips and photography 101 information, and we will be continuing to put what we learned in our "time to click" series to good use and building on those fundamentals of photography as well! If you are just joining us, be sure to review those posts so you can continue to grow and learn with us!

I love sharing a moment in time check out this love story on The Streeters Unlimited
Happy Love Month!

Tuesday, January 29, 2013

Time to Click: Outdoor Family Photography

It's the last week in our special "Time to Click" series and we will be talking about putting together all that great information I have shared!

Today, lets talk Family Photos! Everyone does them, right? So let's take some of tips and put it all together: what do you need, and how do you get the best Family Photos? Here are my top 5 tips for great outdoor family photos!


1. Use your flash. We talked a lot about controlling your light. Using your flash outside helps fill in shadows and create an evenly exposed image.


2. Clean up the Background: Use a Portrait Scene Mode, or control your Aperture to blur your background.  You would never know there are people, and a sidewalk, with fence behind this little darlings head... 


3. Think about your focus area. Every camera can control the area of focus, either by the AF selection key, or by centering your lens on the subject, pushing the shutter halfway down to focus, then without letting your finger up, reposition your frame to control the composition (framing) of your image.


4. Composition / Posing. Going right along with checking your focus area, and repositioning your frame... utilize the rule of thirds (shown above) fill 2/3s of your frame with your subject to create interest. Or, use leading lines to draw interest to your subject... or lines in your posing with larger groups (shown below)! For more composition be sure to read yesterdays post!
Use Rule of Thirds to off center images


Create "leading lines" or use available lines to lead the eye to the subject
5. Understand Light and how to manipulate it. You might think I am cheating a little because I already told you to use your flash... but think about it. If you are taking images in the "cool" light of early morning, bringing along a warm reflector for your subjects will dramatically change your images. At the same time, shooting in the evening "warm" time of day where skin tones tend to pick up the orange and yellows of sunset... using a silver, or white reflector to cool balance that light... or even a reflector to BLOCK light so the sun hits the hair but not the face (see the rule of thirds image again)... dramatic differences!