©Verte Photography All Rights Reserved

Showing posts with label Sensor. Show all posts

Tuesday, July 2, 2013

Tuesday Tip: Shutter Control

What does that "S" mode stand for?
Shutter Priority. It is a great function for situations where you want to control the shutter speed, but let your camera handle the rest of the settings. Almost ALL DSLR cameras, and many Point and Shoot or Bridge camera's have some form of "S" mode. Typically this is found on the dial next to your P, A, and M.

I have talked about some other modes to use to control your shutter, but we haven't really dived into "S".

So, what is Shutter Speed.

Simple. It is the speed at which your shutter opens and closes.

Perhaps the better question to start with is What is a Shutter?

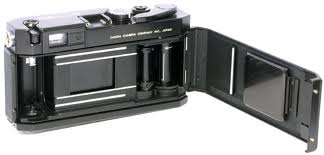
Remember you old school film camera, the film went in the back and there was the "soft spot" in the middle that you never wanted to put your fingers in... and most of you did anyways. This is your shutter... here is what it looks like close up.

The shutter sits between your lens, and your film... or your sensor chip these days. It moves out of the way opening to expose the sensor to your scene and thus creating your image. How long that shutter stays open has a direct effect on exposure of your image. I like to think of the shutter as the eyelid of your camera... if the aperture is the iris that moves larger or smaller to allow more or less light in, the shutter controls HOW LONG the light comes in... and the sensor would be the brain capturing the image. As we know from previous lessons 3 things control your exposure. (How MUCH light, How LONG your sensor is allowed to see that light, and How SENSITIVE your sensor is to that light)


So, why would you want to control the amount of time your camera sees a scene? 
Have you ever taken an image of someone waving? Was their hand blurry or clear? This has everything to do with your shutter speed.

TIP: Shutter speed is measured in seconds – or in most cases fractions of seconds. The bigger the denominator the faster the speed (ie 1/1000 is much faster than 1/100).
A shutter speed of 1/100th of a second is better for shooting HIGH speed, such as action, sports, waving hands... because it stops the action.. it is open for such a small amount of time that it appears you have frozen the movement.Where if you take the same image with a shutter speed of 1/100 it could still appear blurry.
Shutter Priority setting 1/100
 Here is my fan this morning... as you can tell the blades are moving along at a pretty good clip, seeing as how its already above 80 and its not quite 7am yet.

Note: The yellow is due to not using a flash. The light available from the ceiling fan is simply producing the yellow light, I choose not to WB or adjust anything else so we would have a baseline image as we move forward.

Shutter Priority setting 1/1000

Now it looks like the fan is turned off, right? It's not! My shutter simple opened and closed so fast that it "froze" that action.

So when would you use Shutter Priority?

When you want to stop action... such as sports, cars moving, babies moving, birds in flight, butterfly or humming bird wings... these are all calling out for a high shutter speed.


When you want to SHOW movement. Crazy idea, right? But think about it... what is the most beautiful image of a waterfall? The one where its all blending together and looks magically smooth... That's done by blurring the motion, leaving the shutter open for a longer amount of time. What about shooting your holiday photos? What if you want to show that the hummingbird was really flying when you took the image? You want it to be clear, but the wings to show motion. It helps to tell your story.

Now, this is where things get tricky... the longer you leave the shutter open the more things can go wrong for you. Even if you can hold your hands steady, you might pick up what is called motion blur or camera shake, from you breathing or moving the camera ever so slightly. The solution. TRIPOD or MONOPOD. If you plan on doing long shutter photography, like night skys, lighting or even holiday lights, putting your camera on a steady surface and not touching it is your friend!

With the 4th of July coming up.... I bet you know why this was on my mind! FIREWORKS, Baby! Controlling your shutter means you can show the movement in the fall! But remember, a TRIPOD needs to be used so you don't blur the image by holding your camera!

Happy 4th and Happy Shooting!!!!

Friday, January 25, 2013

Time to Click: The Strobe Flash


It's been a big week all about light and your flash! Today, were talking Strobes... what are they, why and how you want to use them!

So what makes a flash a strobe? What's the difference between a built in flash and a strobe flash?

To the first question, well I guess it depends on who you ask... many people seem to think that the term Strobe, is what you would find in studio photography exclusively.  The big lights that have stands or hang from the ceiling. While that is true, those are typically "strobe" lights, and they do flash, the term itself has evolved to more of a street or slang term for simply a light that fires on command (electronically) and syncs with the shutter of your camera.
Portable Flash: Attached and Detached

So, your flash on your camera that is built in, is also a strobe style. Flashing when commanded, rather then the continuous style lighting that stays on all the time like we talked about yesterday. The terms strobe, and flash are pretty interchangeable these days. And so you can have an on-camera flash, a small portable camera flash, a small portable off-camera flash, a low-powered monolight flash, or even an extremely powerful studio flash system, and they are all called electronic flash, and you can call any of them strobes as well!

Just for clarification, "strobe" flash, very different then a "strobe" light... which you would find in any cool 80's disco or hot techno club!
Flashes can be put on brackets to create more distance from the camera

The biggest difference between your built in flash and an additional flash, weather a studio strobe or a portable camera flash is distance and coverage. Which we have talked about before. However, there are several other practical and useful differences as well.  For our purposes today, since we already covered situations and settings for your built in flash, were going to talk about the portable off camera, or attached to your camera flash. While I wont be covering studio "style" strobes, know that these do fall under this category and work for the most part in the same way as a portable camera  flash. I will be sure to do more of a studio lighting class if any of you would like that.

Most of the time in today's world, a flash that can be connected to your camera on a hot shoe such as shown above is called a speedlight. The hot shoe, allows communication to your flash from the camera with electronic sensors.  The biggest thing you MUST know when you go to purchase one,is that if you are not getting one made by the same manufacturer as your camera you MUST get one that is made for your camera. A flash made for "Canon" will mount but will not work on a "Nikon".. or any other brand.

These all have on light modifiers, that bounce, or soften the flash
Next, I find it almost silly to purchase an additional flash with out a bounce, tip, and swivel, option.  If your spending the money anyways, these are very good controls and come in handy more often then you would imagine, once you know what they do.  Basically, bounce, tip and swivel allow you to be in control of where your light source is coming from. It doesn't always have to be directly at your subject! In fact there are occasions when you wouldn't want it directly on them!

Direct flash - creating red eye and darkening rest of image, also washing out cats true coloring due to over exposure.


By bouncing flash from ceiling, you remove red-eye, lighten the image, and show true coloring.


Bounce: So what does bounce/tip mean, and how do you do it? Simple, you tip the top section of your light towards the ceiling or a white surface - TIP: it is very important that it be WHITE, otherwise what ever color you are bouncing off of will overwhelm your image... because it will reflect that color of light back down.  You need to think about where you are standing and where you want your light to hit, think about your angles....

This also not only keeps your subject from being overexposed with too much light hitting them, but it can be very effective in eliminating harsh shadows as well!

Vertical shot, with flash attached and pointed straight on subject. Harsh shadow to the side due to light coming from left side


Vertical shot, with flash pointed at a white reflector up and to the left. This bounced light down, behind the subject as well as covering the front and side. Notice the shadow is much less harsh, and the exposure overall is much better.

Shot horizontally with flash tipped up to bounce off reflector and over entire front and back of subject. No shadow from prop.
Swivel: Now, having a flash that swivels is just as handy... this means you can bounce your light from the side... like what I talked about with using a single light and a reflector for a home studio solution... but it is great for taking shots of people as well.. since again, you control where and how much of the light will hit them, fall behind them, or fall in front of them. Since light is the best way to change the feel of an image and add dramatic effect... this gives you amazing abilities to effect your image!


Flash swiveled to the side towards wall... reflection to hit subject.


Bounced light from the left side for highlight


Location: Being in control of where you flash is located, as in being able to use it off camera, is a fantastic perk! Since light is the biggest effect you can have over creating a "feeling" and "story" with your images.

Slave Flash: As an added bonus, I can also use my flash to trigger my studio lights without effecting my image at all. By swiveling the flash head all the way behind so it's pointing over my head, it can trigger other lights set to a "slave" mode, meaning they fire when they see another flash burst. It works in a pinch for me, since I normally use a wireless remote trigger hooked directly to my studio lights. But for someone who doesn't have that device, or when I forget to pick up a spare battery... this is a great alternate option! Plus this works for other Speedlight style (don't forget thats just a common term for flash that attaches to your digital camera) flashes as well as studio strobes. I know plenty of photographers that have 2-3 Speedlights and use them as studio lighting, rather then bulky studio lights since they can also be set as slaves, and or triggered remotely making on-location studio's much easier to carry around.

Adaptability: These lights not only have good range, power, and provide you with the ability to manipulate that as well as angles and direction of your light, but they also offer you the ability to work with additional light manipulators. I have talked about this a little prior, in our Light 101 post.
These light reflectors, and diffusers are priceless when you are working with people and products. With these products in addition to your flash unit, there is an unending amount of possibilities for your images!


Reflector: Showing translucent, gold and Silver options...


Light Modifier's (umbrellas) for speedlight off camera

I certainly could not do what I do without having full control over my lights. Not only in how I can manipulate where the light is coming from, and how many I can use. But also, in how much output of light, or how powerful they are!

How your flash works:  For the common user, you will set your camera to some sort of  TTL (through the lens) metering option, and your camera will "talk" to your flash to evaluate the light in the scene and they will work together to expose your image correctly.

Additional modes you may find on your additional flash may be, (not all Speedlights let you set all these modes):
    • TTL (Through The Lens): The light from a pre-flash reflected by the centre subject is metered by a sensor in the camera and flash power is adjusted accordingly to expose the centre subject is correctly.
    • TTL BL: Like TTL, but the algorithm used by the in-camera computer to figure out the flash power setting is more complex and takes additional data into consideration.
  • Auto
    • A (Auto): The light reflected by the scene is metered by a sensor inside the flash itself and this measure used to determine flash power level.
    • AA (Auto Aperture): The same as A, but automatically adjusts the aperture setting on the flash to match the aperture on the camera.
  • Manual
    • M (Manual): The flash power level is set explicitly by the user.
    • GN (Distance Priority Manual): The power level is derived from the distance to main subject, as set by he user.
    • RPT (Repeating): Like M, but the flash fires repeatedly during a single exposure.

The more you learn about your flash, and your camera the more you will be able to manipulate the look and feel of your image when shooting it. Which in my book, is the essence of a photographer! That happens when the shutter clicks, not in "post production", at least in my world.

Luckily flashes also come with manuals - I would suggest you hang on to yours since we will continue to grow on this core post and talk more about how to use the manual modes, as well as the other accessories you may have gotten with your flash, and ones you may want to add! For now, I hope you can see where it could be a huge benefit to your photography to add this to your collection of "must have" items in your camera bag and hopefully I have inspired you to grow a bit in your photography world! Next week we will be ending our Time to Click series by putting together some of the lessons we have had in the past few weeks, into practical situations.

Thursday, January 17, 2013

Time to Click: Buttons and Functions 101

You can't get very far in understanding your camera if you don't understand some of the common symbols, icons, and buttons. Plus, even if you know what they are... you might not know when to use them! So here I come... with plenty of information and helpful tips to get you on your way to being more successful with your camera!


First and foremost... if your just joining us, I can not stress to you enough how important it is for you to go back over the rest of the Time to Click series and catch up with the rest of the class! Trust me, you will learn something! Everyone does!

Now, on to today's post.

Every digital camera is different - so it will be up to you to find each item on your camera. I suggest you pull it out and review as we go. If you get stuck or can't find something, PLEASE leave me a message or email me directly and ask!

First. Turn your camera on.
Find your zoom: This could be a toggle button with the icon T and W (Telephoto: zoom in. Wide: zoom out) or this could be you physically moving the lens left to right.
Find your shutter release: What takes the image. Where your index finger rests when holding your camera.
Find your Playback button: This allows you to view what is on your card


Now, do you have a Mode Dial? It would look something like...


If you don't have the dial, typical of P&S and some Bridge styles, you can find most of these icons and functions in a menu option... Look for a "scene mode" or one of the symbols that is a button you may be able to press over and over again to cycle different modes.

Auto (also shown as a green square, Green Camera or camera and "Auto" as shown above)
P: Program
To learn the difference - there there is a BIG difference check this post!


S: Shutter Control (sometimes listed as Tv or Time Value)this is like your eye lid and controls how fast or slow the shutter opens and closes. If you want to stop action like at a baseball game you need a fast shutter speed, or leave the shutter open for a long time to expose a low light situation like holiday lights without a flash. (We will cover all S, A, and M modes in depth later, don't worry!)

A: Aperture control (also listed as Av): This would be like your iris that dilates to control how much light can come into your eye. This also controls your "depth of field" what you want in focus or not...to create images like:


M: Manual: Controls both Aperture and Shutter.

Now even if you don't have S, A and M modes - your camera still will have some kind of pre-set modes called (Scene Modes) that will help you take better images depending on your situation. Depending on your camera you might have TONS of them! (sometimes its listed under the word scene and you have to use arrow keys in the menu to select what you want)


Standard Scenes or "quick modes": Starting from left to right...
The Portrait Head: Controls A settings, to blur the background or foreground of your subject. (sometimes this will command your flash on as well)
The Mountain: Controls A setting, where everything close and far would be in focus (the opposite of the head)
The Flower: Macro Mode / A control: usually allows for either closer focus range, or a more shallow depth of field then the portrait head (less in focus the father you get from your subject).
The Running Man: Shutter control, stopping action Sports Mode. Great for kid sports!

The person with a star: This is a version of a slow sync function! It commands your flash to expose for the person, as well as leaving the shutter open for something in the background like sunset or city scape at night. TIP: Be sure to use a tripod with this function! Also, be sure to warn your subject not to move until you tell them since the shutter may not be closed when the flash is done.

You may also have... any number of others.... this is from an old list from a Panasonic camera.... since point and shoot camera's are made to be simple manufacturers tend to pack a lot of scene modes into them. The idea is that you can select the image of your situation and get better results then the normal program function. Bridge camera's vary in thinking, typically the more manual options you have, the less "easy" modes you will find!


A few to touch on...
Snow, sand, water, beach modes: All three of these situations reflect a TON of light around, typically causing an over exposure situation. (too much light) You can select any of these modes (almost interchangeably, if you don't have one use the other) and get a better result. Typically its controlling the aperture to allow less light in.

Fireworks,  Night scenery, Candle light, Museum Mode, Starry sky, and Party modes: Any "low light" situation you will want to use a tripod for. For most settings they will be leaving the shutter open longer (very slow) in order to create a good exposure. These are all compensating for less light, no flash situations. If you try to hand hold your camera, it may appear blurry due to camera shake. (it may look like your image is rocking side to side)


Kids, sports, pets, and Baby modes: These are usually controlling your shutter as well. Only by making it faster, in order to stop action! These modes may or may not command your flash, or allow you to do so.

Soft Skin, Food Mode: (sometimes also your museum and candle modes): These are typically working not only to give you the best aperture and shutter combination, but the best White Balance as well! If you don't understand White balance here are a few posts to get caught up on!
Light 101
Balance, White balance

There are always some "fluff" or fun features found as well, like the panoramic mode, the transform mode, and the frame mode.. if your curious what they do, use them! If you don't notice a difference, then look it up in your manual! Most of them you will figure out easily once you know what to look for!

Now, there are a lot more buttons on most cameras... it would be insane of me to try to cover every little button! It's a good thing for you I am a little whacky some days! Tomorrow, I will be reviewing some additional buttons and functions for  you to find! Be sure to come back and check it out! Until then, remember I love to hear your thoughts, struggles, and feedback! So leave a comment and let me know if I can help you!


Wednesday, January 16, 2013

Time to Click: Memory Cards

Memory... Memory... Memory!

Wish you had more? Wish it was more reliable? Wish it was faster? Did you know that all of these are things you can control? Well, for your camera's memory at least!

Of course, before we go diving into answering those questions for you - you have to know what kind of memory your camera takes! Luckliy this has gotten a LOT easier in the past few years as well!


First, a memory card is an electronic data storage device used for storing digital information. They are commonly used in many electronic devices, including digital cameras, mobile phones, laptop computers, MP3 players and video game consoles. They are small, re-recordable, and able to retain data without power.  Remember your lens is the eye, the sensor is the brain and the memory card is the "mouth" of your digital camera. I like to think of the memory card as the mouth because its the first step in sharing your images.

Your camera manufacturer determines what type of memory they want to use for their devices. When digital first came out, each manufacturer (or most) had "their" own separate kind.. luckily now most opt for the very popular SD (secure digital) style. It basically won the war being small, and more durable then other competition. 

Since point and shoot, bridge and DSLR's for the most part all use SD style cards I am going to focus on that for the rest of the post, however do take a moment and check your camera though. If you have a CF (compact flash) or something else from an older camera - be sure to check with me for some extra safety and purchasing tips!

Even within the SD card style there are differences... what you will first notice is SD and SDHC

SDHC - Secure Digital High Capacity memory cards are simply cards with a minimum capacity of 4GB (gigabytes). They are still the same physical size the SDHC Cards are newer and used for devices that require a higher capacity card. This also comes with a performance to match. SDHC cards are designed for devices that are compatible with the SD 2.00 specification. (faster)


Remember, if your device accepts SDHC cards, it is backwards compatible with standard Secure Digital (SD) cards.

SD Cards: Were the first style and slower with a 1.0 and 1.1 specification (if your into the numbers thing / for everyone else these are simply slightly slower for writting information and downloading it to your computer). If your camera says SD only for use you will not be able to utilize SDHC cards.  To check if your device is compatible with SDHC look in your device manual or on the packaging, even the card door will typically have it written on it if it accepts the SDHC cards.

Now every card (regardless of style) also tells you the SIZE of memory within the card itself. Remember our chart? 


Your cards could have a MB (megabyte) like 526MB (1/2 of a GIG)
Or a GIG (Gigabyte) like the chart shown above have....
and very quickly were finding TB (terabyte cards will be/are coming out into the marketplace... but we probably don't have to worry you about them right now... just know its like 1000Gig)

You need to know what these mean so you know what your purchasing... 32GB will hold 32 times the amount of information as a 1 GB card.... and depending on your MP(mega pixels) and sensor of your card... this will vary the amount of images you get on your memory card - right? Again, I am going to suggest you get at least 2 cards... and if you go on vacation or shoot a once in a lifetime event... use at least 2 cards swapping back and forth... you know... all your eggs in one basket and safety in numbers and all that... I like back ups :)

You also should be aware that there are different SPEED of cards. This determines how quickly it can accept new information from your sensor, and how quickly it will send the information to your computer. Kinda.  You see, faster cards are better... unless your camera, or card reader, or computer, limits the cards speed. So you may or may not see the difference with a faster card. Technically the speed rating deals with some other things as well.. but overall this is the nitty-gritty of it. I would say if its not a price issue for you - get the higher speed card. When you upload as many images as I do .5 of a second here and there really does start to add up and my time is valuable.

Brands: Just like I suggest a good manufacture for your camera I suggest a well known one for your cards as well. People who have been in business longer and are well known usually stand behind their products and put out better products (in general). I know many photographers who will only shoot with Sandisk cards, and I know others who swear by Lexar. Personally, I have used both and they would top my list as reliable manufactures. They are not the only ones out there... but it would be my suggestion to stick with one of them.

Don't forget: Check your card packaging for warranty information or recovery software. More then once I have purchased Lexar cards that came with recovery software and have used it to recover images from friends cards. Funny enough never my own card, go figure. But good to have regardless!


Another thing you should know is that while the SD card is fairly durable, they can be damaged. They do get errors, corrupted files, and can even lose information or become unreadable. Hense, the tip about having some recover software! Anyways, I have found that these things are more likely to happen in high humidity areas, as well as if they are being handled in dry areas... static shock. Water Damage is also not good... so don't store them in your pockets or anything else that might go into the wash. Trust me.

I have found the best way to keep track of, and keep my cards safe is a memory card holder like this. I like the hard case designs, but have several of the cloth ones and they work well also. They hold the cards in place, and you can tuck one of those silicone packs that come with your shoes inside to keep moisture out. (great in your camera bag also) I even keep a cleaning cloth in mine so I can clean my lens when I change by card. Handy.


Friday, January 11, 2013

Time to Click: Understanding Megapixels pt2

We talked yesterday about the "meat and potatoes" so to speak of what megapixels are, and why they are important to understand. As well as how they relate to your sensor and chip size. Today, as I mentioned will be the "dessert" course, where I will be explaining the end result of what that all means! Welcome to another installment in our Time to Click series!

As I stated prior, the larger your chip and the more megapixels you have on it, the more information your camera can gather on the sensor and the more information you have in your image, which equals the larger file size as well. This is exactly why you see charts like this ...


Most memory card manufactures put something like this on the memory card packaging so you have a reference chart for how many images you get if your camera has X megapixels.

 Rule of thumb: By 2 of the largest cards you can afford. You wont go wrong and it will almost always be more then you think you would need, but you will always want a spare because you will always need it.

Now, I am going to tackle memory cards another day, so I don't want to really get into that - other then to make the point... again.. size matters.


So we left off yesterday talking about size of sensor chips. I told you it would pay off to figure out what you have, because today we are going to talk about how they effect your prints, and that digital Zoom.

Lets take the easiest first.

Digital Zoom.

Turn it off. You don't want it. You don't need it. Manufacturers are not doing you any favors by giving you this option. 

Why?
Well... you own a computer right? If you have prints made you do them online or take them someplace with a printer like a One Hour or Pro Photo lab right?
Any cropping you want is done, better, cleaner and more effectively with ANY basic computer or digital printer then with your CAMERA. Yep. It's true... digital zoom is making your sensor do the cropping for you and without good software, it really isn't designed to do that. Besides, if you want to zoom in on something that you can't physically get to with your optical (thats your real camera lens) zoom, chances are you will need to do other editing to the image as well! You should do it where you have the most control... like a photoshop program and save yourself the digital zoom headaches.

Optical zoom, is your physical lens on your camera. Digital Zoom is your camera "brain" cutting the captured image. Yep... your cutting away your prized megapixels as well... reducing the image size you can print... simply by not knowing better. Just turn it off (check your menu options) and make the commitment to only using your optical zoom! You will be happy you did!

Next. Sensor size and Printing

Sensor Size can effect your print images in 2 ways. The first is a direct reflection of larger size + more information = better quality, sharper images, and being able to print larger. (Or crop in closer to any one area without losing quality!)

This is no different then the thoery behind why 110 film sucked and large/meduim format cameras were the cream of the crop for professionals... 110 film was super small and didn't have the room to store a lot of information being roughly the size of my pinky nail where Meduim and Large format negatives are roughly the size of the palm of your hand. They could store a lot more information and capture light and details better.  They also could be blown up larger, and without "graininess" or what you would call a pixel in digital - because they were simply larger to start with. Same thing in the digital world as far as bigger being better.... and for the some of the same reasons... now there are more having to do with how they are made differently.. but for our purposes... were going to leave it at that.

The other way different sensors effect your prints has to do with the SHAPE of your sensor. Take a look at the shapes below on our sensor chart.


 Your standard iphone, and point and shoot cameras are more square then rectangle - right?

Now here is a chart for your print sizes...

 Notice that your common prints 4x6 and 5x7s are more rectangle then they are square? So what does this mean... basically.... if you have a point and shoot camera.... with a square sensor and you print 4x6 your going to crop your image from the top and bottom... Good to know ahead of time right? You want to know why many places started offering 4.5X6 prints - because they are FULL FRAME from point and shoot cameras (more square then rectangle) Nothing like shooting uncle Bob only to cut off his head every time... this means you want to take the time to check the cropping before you order prints - most places online or in store kiosks will do this - you just have to know about it - if it doesn't prompt you... ASK for help! It's a lot less time consuming then doing it via photoshop or something like that if your end result is just to print.

Note: You can compromise and always leave extra room at the top (when shooting horizontally) or on the sides when shooting vertically. 

 On the flip side, a 4x6 is considered  Full Frame for most DSLR's, showing you everything edge to edge.

However, that also means you have to keep in mind that as you print larger and the print sizes get more square your now cropping side to side. So if you are shooting a group, you have to give yourself extra room shoulder to shoulder (or past the shoulders really) in order not to crop off a person....

This is edge to edge a 4x6 with elbows... but the shaded white shows you a crop for an 8x10. Keep in mind when ordering larger prints you can usually get full frame options... such as 8x12 instead. Again, you just have to know WHY you want it!

I hope you can see why understanding your megapixels and knowing about the differences in sensor sizes is super important to you! You have to be aware what your camera's limitations are!

 You always want your end print to be the result you want!!! Keeping in mind your sensor size, and quality will plays a big role in composition!


Thursday, January 10, 2013

Time to Click: Understanding Megapixles

Digital camera's have been around for a while now... and for the most part you don't run into the same issues that you had when purchasing them say.. even 5 years ago when megapixels were still "good" and not really a part of the "buying" decision. However, I am very aware that many people chuck the technical words out the door without really understanding them, what they mean, or how they apply to your photography. Most people do this simply because its a technical word or subject. Trust me when I say, I get it. I LOVE photography... but when I sit down with technical photographers that are all about the science and numbers... I really feel like my head will explode. It's not that I don't understand them, I do. I just have no idea how they keep all those technical figures about EVERY camera in their heads! But then, there is a reason why I am not an accountant also.


Even though it is not a megapixel race any more, and every camera you purchase these days will produce a quality print easily up to a 16x20... doesn't mean that we should assume that all camera's are equal here or that it "doesn't matter" or shouldn't play a role in your purchasing decision. There are many differences, without even getting technical that you as a consumer should be aware of... and understand. If you are looking at buying or simply looking to get better quality images out of what you have this is very important stuff!

As is my teaching style (explain-er that I am) I feel it's my job to give you information in a practical and "hands on" way. How does this effect you, and what is really important! So, if your craving an exploded head tech report on the newest items... you have to wait your turn, this isn't that post!

Now lets dive in so we can learn WHY you want to care about this technical stuff!

What is a CCD or CMOS chip:

Both the CCD and CMOS chips are simply an image sensor or the capture device of your camera. It the camera's "film" so to speak. It is where the information is captured before it is digitally stored onto your memory card. It is the brain of the camera, if the eyes are the lens, and the mouth is the memory card.  Basically the image sensor job is to take the light gathered from the pixels and convert it to a digital image which is then stored onto your memory card as a file.

What is a MegaPixel ( MP )?
Megapixels are (basically) what your sensors are made up of,  it is what "reads" the information and creates the image. Each sensor is made up of  millions and millions of pixels (think of this like the grain pieces in old school film if your familiar) They capture, and decipher all the information.
 

So the higher the megapixel rating of your camera (or other device) the better your images. In the theory of more is better, the more MP you have the more information that is gathered. Also more MP you have the better your images are as they get printed larger, and the less you are to see them as broken squares or "pixels" when they are printed. (This also controls why you get different file sizes on your images, and why your data cards can hold different amounts of images... it's all based on HOW much information is being gathered)


Almost. There is another factor. SIZE of the chip. Yep, I am going to say it. Size does matter. A lot.


This is a really good chart, but you have to put into your mind just how small were really talking... point and shoot camera sensors are smaller then your smallest fingernail. By a LOT.

If you take just the standard point and shoot camera sensor (Red) and put 12mp on to it, they are all going to be really really tiny right? Now, if you put the same 12 mp on say the Pro DSLR "full Frame" (purple) those pixels by default are larger and capture more information in each one. (like almost 20 times larger) so before you even get into differences in lenses, skill or anything else your Pro image sensor is creating a better quality image even though it has the SAME mp rating.

Crazy right?

To be fair, most DSLRs are not the purple sensor size... but that does account for the "pro" price on the ones that are! Your typical DSLR entry level or "pro-sumer" that mid range camera would be somewhere between yellow and the largest blue. Which makes a HUGE difference.

You should learn what size your sensor is - so that as we talk about differences in lens, and how your sensor size effects cropping and such you can know how it effects YOU! If you don't already know, open your manual to the "specs" page and it should be listed out there! (consider this your homework, because you need this information for part 2)

Now, some people wont like this... but I am going to point this out anyway...  Do you see the grey square,  the smallest one on that chart? That's your Iphone sensor, half of that smallest point and shoot camera quality. So, when you ask why I am such a firm believer in not using them for product images... there ya go. Right now, no matter how good it is, its just not comparable based off the sensor alone. It's like watching the first color release of the Disney Cinderella before any remastering or editing... compared to say... Tangled or Brave.  Functional, but not very detailed or pretty.

Now... Like a good host, I am going to let you digest your dinner before we get to desert! I find that making technical posts too long is a little overwhelming! So tomorrow I am going to continue this train of thought and share with you how your sensor size is related to printing images, cropping, and even that silly digital zoom you hear so much about.