©Verte Photography All Rights Reserved

Showing posts with label photo101. Show all posts

Friday, August 29, 2014

Function Friday: White Balance

Want to take better photos? Who doesn't?

Sometimes we find that our images have color casts that we don't understand, that are distracting.
By learning a little bit about light, and how your camera works you can make a simple adjustment and have a HUGE impact on your natural light images.

White Balance (WB) 
simply refers to the camera mode that allows you to control how your camera sees the color temperature of light. 
By selecting the correct mode - your camera can correct setting White - back to White and saving you countless hours of photo editing and stress! 


If you haven't already - you can print these Keycards and keep them in your camera bag for quick reference!
<Get the second set here>

This double use Key Card lists both the different WB modes and WHEN you want to use them along with a kelvin guide to the color temp / type of light. 
Your most natural light, is during midday - or when you are using flash or strobe lights. 
However, as a photographer you get to choose when utilizing your natural light environment adds to your images - and when it needs to be corrected out. 

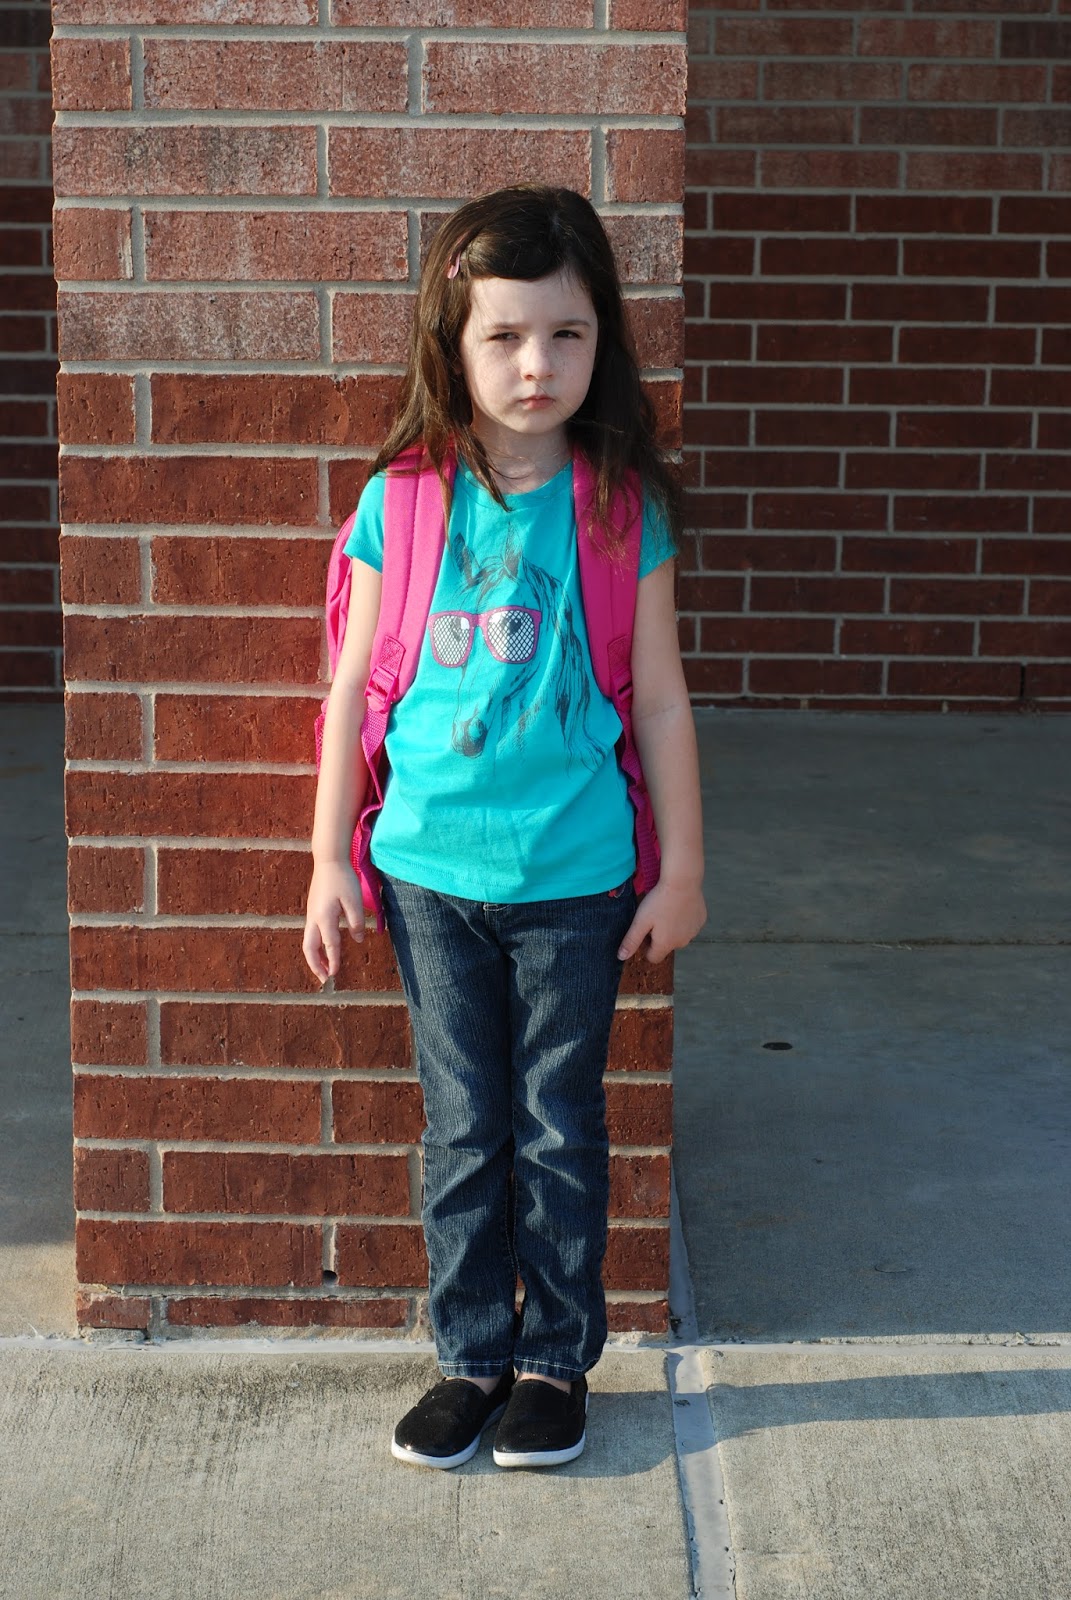
This cutie was taken in the shade during the morning and you can see the blue behind her while blurred should be cement (grey) Personally I choose NOT to correct this with WB because it really makes her eyes pop. 


Where in this image I selected to utilise my WB to remove the cool blue tone because I felt it made her look too pale and it seemed to fight her personal style.

WB is absolutly your friend if you are doing portait work - but another BIG place to use it is product photography. If you are an online retailer doing your own images - this is a tip you want to use! 


Friday, August 22, 2014

Function Friday: Composistion


Composition (in photographic terms) refers to the placement or arrangement of the elements in your image.


Fill the Frame with your subject.


By utilizing a few basic rules of composition and combining them with some basic camera knowlage you can create stunning images.  On our third keycard reminder sheet that you can download directly from the Indie A-list you will find quick reminders for some of the most popular techniques.


If you haven't already - you can print these Keycards and keep them in your camera bag for quick reference!
<Get the second set here>


For today's lesson - I have added some additional images in order to provide a visual for utilizing those rules!
Frame your subject

By using Dad's hands, not only do you provide prospective and scale - showcasing how small this 4.5lb baby is, but you keep the attention on her. 
Precious.


Everyday snap
Change perspective.

Changing up the pose - certainly adds a lot to this image, but so does shooting at a slight angle down towards the subject rather than straight on. 
(Vertetip: there are also a lot of leading lines in the brick pattern bringing your eye towards the subjects face)

While below I created lines with the pose rather than background.


Leading Lines.


Pattern/ symmetry
Patterns can be found in lines of trees, flowers, any repeating pattern... even on the background of a product image. It simply adds interest and balance to the image. 


Taller subject (shoot vertically)

Wider subject shoot horizontally.

When I teach this, people always cringe thinking I am referring to the size of a person... but in truth - you have to take into account the pose - and how much of the surrounding area you want to be a part of your vision for the image.


Our last - and one of my most favorite is the rule of thirds. Fill two thirds of the space with either your subject - or with empty space - either option works.


Rule of thirds (lines provided for visual of the rule)


Friday, August 15, 2014

Function Friday: Flash modes

What is the biggest contributing factor to your images?
LIGHT!

What is your biggest resource for adding light to your photographs? 
The Flash!

Regardless of your camera type, you have the ability to utilize different flash options.
The first step is to understand WHAT those options are:

The above graphic is part of a collection of Keycards
and keep inside your camera bag for quick reference.
<Get the second set here>

Accessing your Flash Function

First, you will need to be in your P mode to command your flash. A / Auto / or the green square mode won't always let you control your flash!
 (For more info about the difference between Program and Auto check this out!)


Now, like with the other function buttons, typically you cycle through the different options by
1. Hitting the flash button over and over changing (or cycling through) the icon on your user display.
2. Using the arrows on your camera back (Cross keys) to select the icon from a menu display
3. Hold the button and spin a command dial (for Bridge or DSLRS)

Understanding the Basics

Much of photography is making choices. Knowing when your flash will help, and when it will hurt your images is HUGE!

First - your camera flash has a "sweet spot" too close and your subject will be over exposed (ghost like face) to far away and they will be underexposed (in the shadows, where the flash doesn't reach)
As a general rule when you use a flash that is built into your camera you want to stand about 6 feet away from your subject. This can be affected by your zoom range, and how light or dark your room is - be sure to play with your flash and get a feel for different situations. 

The biggest part of this to understand is if you are shooting a performance on stage...
like ballet, your flash wont help. You will be too far away for it to do anything more than light the backs of the heads of the other parents. 

Second - There is NOTHING wrong with using your flash outside! When you are taking images of people, it works as a "fill flash" and reduces shadows across their face. 
This is why you see professional portrait photographers using flash equipment outside! 
It provides even, and consistent light for the best exposure.


For additional information on additional flash options for point and shoot cameras
For additional information on strobe flash options
For additional information on Red Eye reduction

Friday, August 8, 2014

Function Friday: Camera Icons

Sometimes the best place to start is at the beginning. 


I recently made up some awesome Keycards for readers of the Indie Alist blog to be able to download, print and carry in their camera bags!

I wanted to offer MY readers - a bit more information on what those cards offer. 
SO.... I will be taking 1 of the cards each week and adding a bit more depth to the content it offers!
The idea behind these cards was to offer a quick reference and reminder to basic camera functions and photography techniques so that you can build your "bag of tricks"!

First up we will be talking about Camera Modes and Common Camera Icons:


 Camera Icons are typically placed on common buttons, menu or display screen so that you can adjust your camera easily (or any camera that you happen to pick up) 

P, A, S, M = Camera operation modes - are typically on a dial you turn it in order to select. 
There is also one I didn't mention "auto" or a camera icon (sometimes green, or a green square depending on manufacture) regardless of the image the selection is the same FULL AUTO = it wont even let you override the flash. DON'T use this option! For many camera's it also limits the menu you can see - so if your looking for a function like WB - you wont find it if your camera is set to this mode!

Even if you are just starting out in photography- you ARE smarter than the camera! 
Camera's can be tricked - shoot in Program so that you can make simple overrides like popping up your flash when your subject is standing in front of a window!


This is a great exsample - the camera will see the light outside the window and think you have enough for a good exposure - however... the grass outside isn't your subject! In order to see our friends here - I popped the flash for a quick capture.

For additional information about your

All consumer level cameras have "scene" modes - these are additional "preset" functions where the camera manufacture has selected the best combination of ISO, Shutter speed, Aperture, WB, and / or flash function for the common situation you are shooting.
For example a Fireworks setting would command the flash off, typically have a fast ISO (chip sensitivity) and a slow shutter. Which means you will want to have your camera on a tripod to reduce camera shake. (use a tripod for slow shutter times unless you want blurry images!)


Scene modes are a great way for someone without a lot of "technical" knowlage to be creative and experience better results in photography! Simply pick the icon that matches with your situation!

There can litterally be 100's of scene modes! While some are on a mode dial on top of your camera others may be found by pushing a button and cycling through a list, or it could be inside a menu.
You may need to look in your camera manual to find where they all are in yours!
I suggest photo coping the page that lists them all out - and adding it to your Keycards!

Friday, April 25, 2014

The Crypto Crud

It's malicious, a virus designed to prey on the one thing people hold so near,
and yet are typically so horrifically undereducated about protecting.
Have you heard?
 Are you at risk?

The newest in a round of computer viruses is making it's way around in cyberspace. This one comes to you via email and is usually embedded into an attachment that you download and open. The ultimate goal of this infection is to hold your computer
 ransom and encrypt your files until you pay the fee to have it removed and the files decrypted

The reason this newest virus is making the news... the type of file it is targeting..

Your Images.

 
After the system becomes infected, the CryptoLocker Virus will immediately start popping up on the computer.  If this happens, the best course of action is to remove it immediately.  The longer it stays on the system, the more difficult it becomes to remove and the more damage it can do to the system.

The easiest way not to fall prey to such a virus is to not open attachments that you are unsure of. Even if the email comes from a known account... if it is just a web link, or an attachment with a generic greeting... you should CALL your friend and verify that they sent it to you first!  
Be smart, use some common sense when your dealing with anything online! 

You wouldn't walk down the street waving around a million dollars in cash right?

There are a few additional steps you can take to protect yourself! 
Not just from this newest threat but for all the others that will come after it.

Thankfully many security and virus checker programs are already coming out with updates in order to find and remove this virus. If you don't already have something like...

(What I use, and have had great luck with as a anti-virus, internet security program)
or
Hitman Pro 
(which is a secondary line of defense, that I also use.) 
I suggest you look into a virus / malware security program that would best suit your needs. 
While I use these two... there are several options out there and I suggest you do your research in selecting your own.
If you're online, on a computer or any device that also contains important documents or images you want to protect that you make sure you install some sort of virus and malware protections. 
Yes. DEVICE. Even your smartphone or tablets could be suspepable to viruses and malware.

The second step I suggest would be to BACK UP your images regularly.
Back them up to a removeable harddrive, a NAS, the cloud... Disks, USB....
I suggest at least 3 different options. 
I personally drop our family images onto disks and keep a copy in our fire/waterproof safe along with a copy that is sent to Grandma, so we have one complete set "off site" so to speak.

I also use BACKBLAZE
which is a cloud based backup system that copies your ENTIRE system, as many hard drives as you want, for roughtly $5 a month. You can set it to run at night, so you have a continuous cloud backup. 
I personally like Backblaze over other cloud backup systems because you can download a whole drive, or 1 file. You can also order a drive or USB of your backup to be shipped to you if your entire computer crashes. Many people find sites such as Dropbox, or even their Google Drive account a suitable option for an online storage option for documents and image storage.
It's peace of mind. 
I also, backup all Images (personal and professional) to a removable hard drive weekly as well as a NAS (Network Attached Storage) which is basically several Hard Drives that are connected to my network. It backups any changes, or new files each night.

I don't believe that this is the first, nor will it be the last virus that will seek to attack at the heartstrings of your family... those things that everyone holds most precious... your family.
Your memories. 

I can not begin to tell you how many clients and friends I have heard crying and devastated that their images have been lost... either from computer crashes, virus, or (eek) a lost phone.With the release of this newest virus it's a good time to remind each of you how easily digital files can be lost.

However, if you take a little time... spend a minor amount of money you can safegaurd yourself!


Friday, April 11, 2014

The MagMod

Every now and then Kickstarter provides my family with a new toy. This time, I was lucky enough to have this little gem picked up for me as part of a gift. Introducing the MagMod.


When I first looked at it I thought... well that looks fun... but I don't know how often I would really bust that out to use.... and then I put it on my flash.

See, the first odd piece with the square cut out stretches to fit over your speed light. It has magnets in it that you can then literally SLAP on the honeycomb filter... or multiple honeycomb filters. This image shows the filter being held by the magnet - but not properly placed for use. (just to clarify)


Here is how it looks attached.

Now... there are times when I want to use my flash, but I don't want that harsh "flash" look... and this is a great option to break up that light. I haven't had a chance to test it on portraits but I think it would be a solid option. the part that has me dancing... like really moving and grooving and bouncing in my seat...  gel options.

While I don't use gel's in my photography as a general rule, it has mostly been due to a complete hatred of the thin plastic sheets and that they get torn or bent too easily. 


WHALLLLAH! Introducing hard plastic, easy to pop in and out gels that fit over my speed light! Slap on... slap off! It's MAGIC I tell you MAGIC! (Okay, really it's ingenuous... not magic but I LOVE it!)

Now the kit that I got came with 2 honey combs, and a variety of gels... red, yellow, blue, there's like 6 or 8 of them. you simply stretch the plastic away from the gel that is inside to pop one out and the other in. They are nice and flat and store easily in a pocket of my camera bag. Why oh why am I head over heals in love with this? Because, it means that I can use my speed light as my back-light, and be a little more creative and custom on backgrounds for clients.

Taking an image like this....
Which is perfectly acceptable... (and an amazing product made by Dragon Flight Dreams)

and make it a bit more special... like this.

In an instant.

As for new cool must have toys, I give this one two big thumbs up for my use. Is it a product everyone needs... of course not! That's what makes it FUN! 

Thursday, April 3, 2014

Selective Focus


I'm not talking the selective focus you use when your trying desperatly to read the last 20 pages of your book when your child is chatting you up about barbie's latest fashions... I'm talking... Photography!

Selective focus is a technique used in photography. You focus n a specific part of a subject that you want to highlight or emphasize, and you let the rest of the image fall into a the blur of the background. This is the effect created by a shallow depth of field.

Did I lose you already?

It's really simple... all those images where you see one part in focus, and everything else blurred... the photographer has used their aperture control to create that effect.


There are three things that go into creating images like this. The First... is your F-stop ( Known more commonly these days as your Aperture setting)

Aperture Control: The A mode on your camera, or part of what you control in full manual. Aperture is like the iris of your eye it opens wider or closes tighter to control HOW MUCH light gets into your image. The more light, the LARGER the aperture (the smaller the number)  

Aperture controls the "depth of field" think of this as a field of flowers. Do you want the one an arms length away to be just as clear and sharp as the ones twenty feet away? This would be done with a small aperture (Big number like f/22). If you want to highlight one of those flowers that is an arms length away and let the rest fall to blur then you use a large aperture (Small number like F/2)


2. Focal Length: There is a lot of tech and science that can be learned about this, as well as a lot of differences in the types of lens. However, what you NEED to know for this lesson is the Focal length refers to the wide angle, or telephoto number of you lens. When you say I have a 28mm lens, or a 18-55mm those numbers are the "focal length" of your lens. 

A lens of a shorter focal length will create a greater depth of field than one of a longer focal length... so opt for a 28mm over an 85mm (if you have a more "all purpose" lens like an 18-55 - keep the lens in the 18mm position, this will allow you the largest aperture setting as well)


2. Distance: The closer you are to your subject, the less depth of field that will be generated.


This is a great sample of blurring out a busy pattern in order to draw your eye to the beads on the lanyard. You can see the smallest of them in the loop clearly, as well as the cute bee and bugs. While leaving the foreground and background to blur out.The further away your background is the more blur you will achieve.


There are a lot of moments in photography where you will want to utilize this technique. The most common are...

Macro or Product Photography. 
Like the two examples I have given above, I have used this as a powerful way to draw the viewers attention to a very specific part of the image - my main focus of the subject matter.

Portraiture.
You can use this to create a general feel of mood in your image, putting the emphasis on your subjects face (or in animal photography the eye, specifically)


Fixed lenses (the ones with only one focal length number such as 28mm) are widely known to have large apertures (like 2.0 or 1.8) in order to specifically create these types of effects! Does that mean that if you don't have a manual camera or a lens like this that you can not achieve the same greatness...

Of course not!

You will find even on point and shoot cameras the ability to select a Flower mode (macro), a portrait mode (the shape of a head) at the very least... many camera's these days have even more to choose from that specifically adjust your camera's aperture setting to create this effect. Those "preset" modes are simply programmed combinations of aperture and shutter settings to achieve a specific effect. You will get a lot more use out of your point and shoot camera if you learn a few basic ones like these!

Happy shooting!

Tuesday, February 25, 2014

Putting it in Perspective

How do you look at the world?

Is it bigger than life, a stepping stone across the lake, a bright brilliant smile?

Perspective, is your view, your take on life. It is also a great camera technique. Where you lead the viewer of the image on a journey. 


One of the easiest way's to create perspective, is by adding something to your image that people can relate to. In the case of the above image, this is the father's hands. It tells the story in this single image of 4 1/2 lb premmie angel named Hope. 

Delicate, loved and protected. 

This week I will be talking about several different ways to utilize perspective in your photography! I would love to see your images, so...
Today, I challenge you to find something around your house, and use perspective to tell the story.. 

Look and think before opening the shutter. The heart and mind are the true lens of the camera. – Yousuf Karsh

Tuesday, May 7, 2013

Tuesday Tip: The DIS Function

What is DIS: Digital Image Stabilization. This is an Olympus function found on Olympus cameras, however most digital point and shoot cameras have some version of this regardless of brand.

Basically this function increases your ISO settings in order for your chip to gain more information with less available light.

NOTE: This is a DIGITAL function done on the CHIP / processor of your camera. NOT in the lens of your camera.

This function should not be compared to, or confused with the Cannon (OPTICAL) IS, or Nikon VR (Vibration reduction) or any other LENS term. It functions, acts and has a completely different effect on your images!

I first came across a client who had been doing her own product photography and had to ask what she was taking images with that was causing them to be so grainy (ok yes, digital people grainy is a film term for the "digital noise" you get on the chip.. I'm from the old school of film.. it shows sometimes).
She told me the camera that she was using... and I had to probe a little more... no way that camera was in the right mode and kicking out these images! She told me that she used the DIS mode, because someone said it would keep her images from being blurry.

OH STOP THE PRESS! 

I mean... SHUT THE FRONT DOOR (see I can be hip, lol

They said WHAT!? 

No no... let me tell you what really goes on. 

The elements of an exposure:
Your camera is like your head, right?
The eyelid is your shutter it "blinks" or opens and closes to control HOW LONG the "frame" or image is exposed for.
Your iris is your Aputure: it dilates or contracts allowing for HOW MUCH light will be let in.
The Brain is like the chip. It has to decipher the code. You can also set the SENSITIVITY of the chip (ISO) so it can "remember" or "capture" more information.

Note: These 3 things control your exposure. FOCUS is controlled by your LENS.

Which is what this "DIGITAL" IS mode is doing. It is increasing the sensitivity to light so your camera can capture more information.  This however, does come at a price. Just like in film days.. when you had to learn the differences in film speed... its the SAME concept.... they didn't even change the term when they made it digital! Lucky us!

So remember your film speeds... 100 - for BRIGHT sun, then you increased the speed according to each lower light, or faster action that you planned on shooting.... so 800 was good for inside low light, or sports... but when you got it printed it looked green and had little dots all over it, and it looked worse the larger you printed them? That was the FILM grain. Because in order to make film more sensitive to light they made the pieces that the light reflected off of (the grain) larger... so you saw it when you printed it... because you basically put it under a microscope to make a 4x6 version.

Ok... so how does this history lesson apply... take everything I just said, and change the word film, with digital... and grain with noise.

Instead of the pieces physically increasing in size they become more "sensitive" to light electronically... but the result is the same, only with better color balance. You see spots on the image which make it appear MORE broken and that "could" be described as blurry... but its not, its noisy because your seeing the pixels braking down in the image. sensitivity was turned up.  If your sensitivity is turned up, things don't look clear... so don't do it when you need quality clear images!

Now.... DIS has its place, just like 800 speed film... and that place is LOW light NO flash venues... like concerts, parties... things like that. Places where you need it to be more sensitive, because of the low light, no flash, and no tripod... but your not trying to sell an item, your trying to capture a moment.  It's like.. the last resort option to get any sort of workable image.

NOT for product photography.

If your images are blurry from camera shake (which is the most likely suspect, and the reason this  DIS mode would have been suggested at all) during your product photography sessions- you have WAY to little light on it! Instead of adjusting by controlling your ISO, which may increase the sensitivity, but adds grain/noise to your image, consider shooting during the day, or outside, or with a tripod so you can leave your shutter open longer, adjust your shutter speed, or aperture... or in just about any way...INCREASE your light... or QUALITY of light. This means less grain / noise and less distractions to your image.

I am happy to report, that my client took my advice and now even the images she has to do herself are turning out more clearly and with some practice and other tips her backgrounds are getting more and more white - and the focus is become more and more on her products! I LOVE that she continues to improve and her shop is better for it!

If you are stumped by a photography situation, want me to troubleshoot and tell you what is going on or how you can take better images - Please just ask! I love to see you succeed!