I don't jump on the "blog" wagon very often for challenges and such... but I am sure you noticed a sever drop in my posts this summer! While I am prepping some great holiday tips and more photography "how to's" and my technical posts that take up some time, I thought you would enjoy a month of "getting to know me"
While I don't promise to hit each day, or topic, or that I wont put my own "spin" on it... I was told my blog was "lonely". I think the word my friend was looking for was "neglected" so to satisfy my friend, and all of you... this seems like a great opportunity!
Today's Challenge: Tuesday, Sept. 3: Describe where or what you come from. The people, the places, and/or the factors that make up who you are.
I am a Colorado Native, my family is from Germany, Ireland, and Czechoslovakia.
I grew up in Alaska
I was told often that challenges in our life "build character".
You had to be tough to survive in our family, even going to the grocery store was an adventure.
It was not uncommon for a moose to block your path, or be sleeping at your bus stop... we had an "excused" absence when that happened.
I started in the photography industry getting a job as a telemarketer.
I am still friends with people I worked with there, some 20 years later.
I have been held up at gun point and my retail store robbed.
I have ducked under a jacket from "flying puke" after a night of dancing and drinking with friends.
I have dodged projectile baby vomit. No one ever told me how those skills from crazy drinking nights would prepare you for motherhood.
I have never been the mom (thankfully) with the out of control or screaming baby on an airplane.
I have however had my child puke on another passenger, when she got motion sickness.
So fun.
My version of the song "I have been everywhere".... I have been to....
Colorado, Alaska, Nebraska, Kansas, Oklahoma, Texas, New Mexico, Utah, Nevada, Arizona, Wyoming, Montana, Oregon, California, Missouri, Arkansas, Illinois, Kentucky, Tennessee, Georgia, South and North Carolina, Alabama, Mississippi.... I've been everywhere... I've been to... Virgina, West Virgina, D.C., Maryland, British Columbia, Alberta, the Yukon, Cabo, Puerto Vellerta, Mazatlan, Cancun... and oh yea... Miami, Florida and Key West.
It might have been faster to say where I haven't been.
My Favorite "southern" saying "Don't let the door hit ya, where the good lord split ya"
I have loved, lost, played, and drank with the best of them.. now while many of my friends are sending their kids to college.. I am sending mine to first grade.
My friends, are my family.
One more thing, I don't know where it was so ingrained into my sister and I, but in our family you could not talk to a relative for years and years... yet help them with anything if they called you out of the blue. That's just how we are.

Tuesday, September 3, 2013
Friday, August 30, 2013
What our Clients Say: Melli's Yarn Works

I want to start this off by saying how much I loved working with Candy. I have always enjoyed looking at her pictures, and seeing all her amazing pictures made me happy when she extended her photography services for my items!
After some thought I decided my loom knit items would benefit far more in being photographed professionally. Being that they’re so much bigger than jewelry, they have been a challenge for me to photograph.
So into a large box they went, ready to be photographed! Hats, scarves, wrist warmers, all into one giant box.

She was very quick in photographing the items. She is extremely thoughtful and creative when taking pictures, she even had a special model up to show off my scarves!
I had HUNDREDS of pictures to look through at the end. I might be exaggerating but each one of my items had at least 10 shots. And she even let me see them as she fixed them! They were brilliant, and she always asked my opinion, whether I was happy with them or wanted anything fixed.
 |
| "Melli" Verte's Mannequin was designed and made her debut just for Melli's Yarn Works |
I had HUNDREDS of pictures to look through at the end. I might be exaggerating but each one of my items had at least 10 shots. And she even let me see them as she fixed them! They were brilliant, and she always asked my opinion, whether I was happy with them or wanted anything fixed.
Of course with her brilliant skills I don’t think I asked for anything to be changed!
I have to mention the ease of her website. Brief pause in my epic story. Her site allowed me to view the pictures as she posted them. I also goofed off and looked around her site at her past work and other awesome things :)
And on top of these fantastic images, she watermarked them for me! As a shop owner, I do the entire process myself usually. Make the item, photograph. Edit and watermark. Post picture. Make listing. Share listing. So much work! But Candy was able to cut my work in half!
I got my products back incredibly fast. I believe it was under two weeks, maybe even just a week! Along with the items tucked back into their protective sandwich bags was a CD with all the pictures so that I would have my own copy.

I am extremely happy with her work and working with her. I highly recommend Verte Photo to everyone who needs photography help or wants their products to look incredibly epic. I’m going to be getting ready to talk to her about photographing another batch of my products because they just need it!
| Melli's Yarn Works Store |
 |
| Melli's Trinkets |
Client reviews are posted without any editing done by myself, all opionins and comments are made by the author and they receive no compensation from me for providing this feedback.
Wednesday, August 28, 2013
The Retouching Line
Retouching, editing... re-creating or changing an image... it's a pretty hot topic. There are photographers who, like me believe less is more.
You don't like the wrinkles? You EARNED them.. every line, every imperfection... that's part of your life. Your up's, downs, and let's face it, it's reality. Just because you "can" fix, remove, or change something in photoshop... does it mean you should?
I used to spend time on each image and "touch" everything that I posted for a client to view. Sometimes I would do serious retouching, sometimes just a little nudge that I felt made the image just a little better. Now, I can say I pull all my image through what I call my editing process - where I view them all, and occasionally make a small change. However, I don't retouch the imperfections on every image. That's my line. If you want it.. it's something that really bugs you, then I offer a retouching service for my clients. No problem. I "can" do it.
Like in my cooking though, I believe less is more. Your skin isn't one tone, you have highlights shadows... and different tones. I try not to remove that, even during retouching to "lessen shine" or "even skin tones". I don't want to make you look like someone else... I think your amazing just the way you are! That's not to say that I don't feel for kids with acne, or moms who's babies scratch themselves the night before a shoot. I get it... really I do! Sometimes it's simply necessary. Sometimes, it's just plain vanity. Your line between the two, is your choice.
Want me to cover your wrinkles in Photoshop? Sure... how about you tell me it bothers you ahead of time, so I can work with lighting, posing and even the magic of filters to soften and disguise them to start with?
Your not Barbie, I am not going to make you look like Barbie. Plus... have you ever seen a portrait of Barbie? SHE even has imperfections! I feel like I am in my zone and I am LOVING my business. It's organic, natural and that's the photography I LOVE! This is my line in the sand: Retouching has become an additional expense to my clients as of last year, and I couldn't be more happy with that choice. No longer spending 40 hours retouching every image for one session, which frees up my time and energy! Now my clients really think about the images, and the work that they are getting done. For some, this hasn't limited the requests, and that's fine... I am happy to do them! I simply believe, they should be the ones to choose what their images look like, how they are going to be printed, preserved and passed down to other generations.... not me.
Next time you ask your photographer to "make it look like you lost 20 lbs" or that your 10 years younger... think about those amazing images you have of your grandmother, ones before digital retouching became the norm... are they priceless to you? Do you love them and her for who she is? Or, do you think less of her for the imperfections?
You don't like the wrinkles? You EARNED them.. every line, every imperfection... that's part of your life. Your up's, downs, and let's face it, it's reality. Just because you "can" fix, remove, or change something in photoshop... does it mean you should?
 |
| @VertePhotography "before" |
I used to spend time on each image and "touch" everything that I posted for a client to view. Sometimes I would do serious retouching, sometimes just a little nudge that I felt made the image just a little better. Now, I can say I pull all my image through what I call my editing process - where I view them all, and occasionally make a small change. However, I don't retouch the imperfections on every image. That's my line. If you want it.. it's something that really bugs you, then I offer a retouching service for my clients. No problem. I "can" do it.
 |
| @VertePhotography "after" |
Want me to cover your wrinkles in Photoshop? Sure... how about you tell me it bothers you ahead of time, so I can work with lighting, posing and even the magic of filters to soften and disguise them to start with?
Your not Barbie, I am not going to make you look like Barbie. Plus... have you ever seen a portrait of Barbie? SHE even has imperfections! I feel like I am in my zone and I am LOVING my business. It's organic, natural and that's the photography I LOVE! This is my line in the sand: Retouching has become an additional expense to my clients as of last year, and I couldn't be more happy with that choice. No longer spending 40 hours retouching every image for one session, which frees up my time and energy! Now my clients really think about the images, and the work that they are getting done. For some, this hasn't limited the requests, and that's fine... I am happy to do them! I simply believe, they should be the ones to choose what their images look like, how they are going to be printed, preserved and passed down to other generations.... not me.
Next time you ask your photographer to "make it look like you lost 20 lbs" or that your 10 years younger... think about those amazing images you have of your grandmother, ones before digital retouching became the norm... are they priceless to you? Do you love them and her for who she is? Or, do you think less of her for the imperfections?
Wednesday, August 7, 2013
Wednesday Dinner
So today, since I am still recovering from July I thought I would turn the blog over to a fantastic woman I know! She's a smart, super crafty mom, who just happens to own her own online business, Violets Buds. I know I have introduced you to her before, and I hope you enjoy this great recipe she put together for us! It's coming to you just in time for back to school, when we can all use something easy and YUMMY! Enjoy!!!
After too many disappointing Chinese take-out meals, my husband Scott & I decided we had enough. He did some online research and found a few recipes that we tested. This recipe for Orange Chicken & Fried Rice is one we tried, made a few changes, and now is a regular in our house.
 We take a shortcut to make it an easy weeknight meal by using frozen breaded chicken nuggets or tenders. The following recipe makes 4 servings, and can easily be increased. To get the main part of the Orange Chicken & Fried Rice started you will need:
Frozen breaded chicken nuggets or tenders
2 cups Rice (white or brown)
We take a shortcut to make it an easy weeknight meal by using frozen breaded chicken nuggets or tenders. The following recipe makes 4 servings, and can easily be increased. To get the main part of the Orange Chicken & Fried Rice started you will need:
Frozen breaded chicken nuggets or tenders
2 cups Rice (white or brown)
 Start by cooking the rice & chicken nuggets according to package directions. While the chicken & rice are cooking you can start the orange sauce.
 Orange Sauce
1/2c water
juice & zest of one orange
1/4c lemon juice
1 tbs rice vinegar
2 tsp soy sauce
2 tbs brown sugar
1/2 tsp ginger (we use powder, but fresh is good)
1/4 tsp red pepper flakes (or a dash of cayenne pepper)
1 tbs cornstarch
Mix all sauce ingredients thoroughly, then bring to a simmer over medium heat. Once it starts simmering, reduce heat & stir constantly until the sauce thickens. Turn heat to low.
By now the chicken & rice are probably done. Next step is to start the fried rice.
Orange Sauce
1/2c water
juice & zest of one orange
1/4c lemon juice
1 tbs rice vinegar
2 tsp soy sauce
2 tbs brown sugar
1/2 tsp ginger (we use powder, but fresh is good)
1/4 tsp red pepper flakes (or a dash of cayenne pepper)
1 tbs cornstarch
Mix all sauce ingredients thoroughly, then bring to a simmer over medium heat. Once it starts simmering, reduce heat & stir constantly until the sauce thickens. Turn heat to low.
By now the chicken & rice are probably done. Next step is to start the fried rice.
 Fried Rice
Cooked Rice
1 cup Frozen mixed vegetables
1 cup Frozen shelled edamame
2 eggs, scrambled
2 tbs soy sauce
1 tsp brown sugar
In a large skillet or on a flatop griddle pan, start by cooking the frozen mixed vegetables & edamame over medium heat with either a pat of butter or coconut oil. Add the rice, then sprinkle with the soy sauce & brown sugar, stir well. Push the rice & veg off to one side of the pan, then start frying the eggs (add black pepper if desired). When the eggs are done, mix with the rice & veg.
Fried Rice
Cooked Rice
1 cup Frozen mixed vegetables
1 cup Frozen shelled edamame
2 eggs, scrambled
2 tbs soy sauce
1 tsp brown sugar
In a large skillet or on a flatop griddle pan, start by cooking the frozen mixed vegetables & edamame over medium heat with either a pat of butter or coconut oil. Add the rice, then sprinkle with the soy sauce & brown sugar, stir well. Push the rice & veg off to one side of the pan, then start frying the eggs (add black pepper if desired). When the eggs are done, mix with the rice & veg.
 Right before serving, toss the chicken nuggets in the orange sauce to coat & serve over a bed of fried rice. Or, if you prefer, you can spoon the orange sauce over the fried rice & chicken.
 I hope your family enjoys this easy, tasty meal as much as our family does!

Violet's Buds
http://www.facebook.com/violetsbuds
http://violetsbuds.storenvy.com/
https://www.etsy.com/shop/VioletsBuds
http://violetsbuds.blogspot.com/
After too many disappointing Chinese take-out meals, my husband Scott & I decided we had enough. He did some online research and found a few recipes that we tested. This recipe for Orange Chicken & Fried Rice is one we tried, made a few changes, and now is a regular in our house.


Violet's Buds
http://www.facebook.com/violetsbuds
http://violetsbuds.storenvy.com/
https://www.etsy.com/shop/VioletsBuds
http://violetsbuds.blogspot.com/
Saturday, August 3, 2013
Vacation Bumps
I bet you were wondering if I simply ran away!
Nope... I got back from our "vacation" last week and have been getting caught up in the office. Since we moved a week prior (what was I thinking) we had more then a few bumps in July. But now were back at it, and working on getting the office, studio... and house unpacked and organized, before our getaway weekend and school starting later this month!!
I am hoping to share with you some of the fun things we did, and the great families I was able to meet up with - since this wasn't just a vacation, but I spent loads of time toting around the camera bag and out in the hot Colorado sun shooting families, seniors and kids... it was a blast! The people I spent time with are truly the best, they wait all year for me to visit, and I LOVE them for it!
We did get out and enjoy some fun things that CO has to offer - and I will be sure to post a little about those places - because I highly recommend them if your visiting!
Just hang in with me in the next couple of weeks as I sort images, and work to get out disks to clients who have already been waiting 2 weeks for previews. I have to take care of them before I start "posting" any in depth topics again!
For now, enjoy whatever time you have left for this summer!
Happy Shooting!
Tuesday, July 16, 2013
Tuesday Tip: Understanding Lens Terms
Wow are there a lot of different types of Lenses! I thought I could break down some terms for you so as you grow with your camera's you will have a better understanding of each and how it applies to you!

Now... lets get started...

Now with digital these numbers may mean different things due to the different size sensors and how your lens work with those sensor sizes... I know... can't make anything easy can they!? For our purposes today tho, we are going to work off of "standards" where 50mm is what your eye sees.
TELEPHOTO LENS: If you move your arms in closer together, it is "telephoto" bringing a section of your field of view in closer to you. The closer your arms are the less field of view, but the closer things appear, and the higher number you would need to accomplish this such as the Green line above shown as a 400mm.
ZOOM LENS: Also referred to as a Variable Focal Length Lens. When you look through it, you can change the magnification. Examples: 18-55mm, 24-70mm. This doesn't mean it has a great telephoto, simply that it changes. It's a very loose term, typically applied to point and shoot camera's with a 3x or 16x "zoom".
Point and Shoot owners get to do some math to figure out what that all means - basically the higher the X (magnification) the more telephoto you have. If you want to figure out how much, simply take the wide angle number of your lens such as 38mm (a standard) and times it by your zoom number... for example: 38mm x 10x zoom = 380mm telephoto
FISHEYE LENS: A wide-angle lens that takes a hemispherical image. It produces a distorted image, convex in appearance, and covers a broad area of view by doing so. Focal lengths typically range from 16mm and lower. Examples: 8mm, 10mm.
FAST LENS: A lens that has a large aperture which allows you to take photos in low lighting without a flash. When someone is talking about "fast" lens they are talking about the "F-stop" ability of that lens, basically the maximum aperture on that lens such as: 50mm f1.4
As you will learn with Aperture settings the smaller the number of the F the more light is is able to gather, the "faster" it is. The LARGER the number the less light that can be gathered the "slower" it is.

STANDARD LENS: Also referred to as a normal lens. This would be considered to be the lens that gives you about the same perspective as normal vision. Nothing would appear any closer (or further away) than you would see it with your normal vision. This focal length will change depending on which type of camera that you use. If using a 35mm film camera, a 50mm lens would be considered as the normal or STANDARD lens, When using a digital camera, the magnification or crop factor must be considered when determining a normal lens. (Again, Standard and Normal is simply the mm number of what is equivalent on your camera to what your eye sees when you look straight ahead.)
PRIME LENS: Any lens with a fixed focal length. When you look through it, you can't change the magnification. Examples: 28mm, 50mm, 85mm, 135mm. Also referred to as a Fixed Focal Length Lens. Yes, a 50mm lens is a "standard" as well as a PRIME lens...
MACRO LENS: A lens that allows you to focus much closer to the subject (than a non-macro lens). Examples: 50mm 2.5 macro, 60mm 2.8 macro, 100mm 2.8 macro. Not all Macro lens are Prime lens, it is just as common to have a 28-70 macro, where you have to "lock in" the macro function when you want to use it. This simply is telling you that the lens has the ability to focus closer on a subject then others for the same range.
PORTRAIT LENS: A lens that gives the best perspective for taking portraits. This will vary depending on the camera that you're using. Typically you will find an 85mm prime lens, while some photographers prefer not to shoot with prime lens, and opt for something with better range like an 28-120mm. It is pretty subjective, tho most professional photographers agree staying within that 28 - 85mm range is common.
While this doesn't cover all the differences of lens types... it does give you a good overview of the different classifications of lens!
Happy Shooting!
Tuesday, July 9, 2013
5 Survivor Tips to Traveling with a Kid.
I tell you I LOVE road trips... always have!
I was easier before the family... me, a friend... the open road.
I think it reminds me of when we were young, Dad would load us up in the red Ford truck... no matter where we where, there always seemed to be a red Ford truck in our lives. Funny. We would survive on warm Coke, melted Hershey bars... oh the good ol'days... before I knew what calories and real chocolate tasted like!

In my 20's I spent a lot of time driving with the music blaring, windows down... and sunglasses on.
Now, road-trips or traveling in general has taken a whole different spin. Sure I go old school with maps not GPS, and I still bring some tunes to rock out to.. and snacks... MMMM snacks... but they tend to be more like grapes, pretzels, trail mix, water...
I also tend to have a passenger now... the bug. Who, by the way... used to get car sick. YUM. So, I thought rather then writing to you about all those travel tips you hear about all the time... I would share a few tips for traveling with a kid who does (or might) get car sick. Here are the things everyone should pack... and know... but no one ever tells you!
1. Wear a tank top under your clothes. This is extra special if your in tight quarters such as a plane when the vomit starts flying... so much easier to change (pack extra shirts (for both of you)in your carry on, or easily stored so you can change in your car) if you don't have to carry a sick kid to the tiny restroom... covered in yuck.
2. Plastic bags are your friend. Not only do they easily separate toys, or games as you travel, keep markers and other activities easy to reach... but you can put trash, or vomit covered items in them, zip them closed... and presto... smell contained.
3. Bring along Vinegar. Ok, TSA not approved. But a little spray bottle inside your toiletries bag is hardly looked at twice and kills the smell, while helping to clean seats, tray tables, car seat covers and seat belts. Extra towels when your in your own car is super nice as well!
4. Ginger Cookies. If your packing snacks anyways, bring these along. It's nice and dry, and the ginger helps to calm tummies. Keep plenty of water around as well, it will keep the kiddo hydrated as well as providing relief from the spice.
5. Skip the Milk. Now, maybe it was just us... but it seemed like Milk+Travel (of any kind even across town)+ Heat = DISASTER. Once I stopped offering milk (milk products of any sort) on days I knew we would be traveling, like to see Great Grandpa 300+ miles away.. my life got a lot easier! We would have Soy or Almond milk with our breakfast, even carring a bottle with me when we moved across country so we would have it at the Hotels. On times when I followed this rule we NEVER had an issue with being car sick.
AMAZING!
Many kids get sick from looking out the window while traveling so if you can keep them entertained with activities inside the car, so much the better, we tried to keep her in the middle seat so she could look out the front whenever possible - did it help? Eh, maybe... it certainly didn't hurt.
Now that she's older, we have grown out of most of it... but I still follow these rules... I had a VERY hard flight to San Diego one year... and now I am more prepared.
Plus, I can help someone else out and pay things forward if it ever comes up!
Tuesday, July 2, 2013
Tuesday Tip: Shutter Control
What does that "S" mode stand for?
 Shutter Priority. It is a great function for situations where you want to control the shutter speed, but let your camera handle the rest of the settings. Almost ALL DSLR cameras, and many Point and Shoot or Bridge camera's have some form of "S" mode. Typically this is found on the dial next to your P, A, and M.
I have talked about some other modes to use to control your shutter, but we haven't really dived into "S".
So, what is Shutter Speed.
Simple. It is the speed at which your shutter opens and closes.
Perhaps the better question to start with is What is a Shutter?
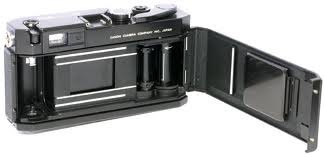 Remember you old school film camera, the film went in the back and there was the "soft spot" in the middle that you never wanted to put your fingers in... and most of you did anyways. This is your shutter... here is what it looks like close up.

The shutter sits between your lens, and your film... or your sensor chip these days. It moves out of the way opening to expose the sensor to your scene and thus creating your image. How long that shutter stays open has a direct effect on exposure of your image. I like to think of the shutter as the eyelid of your camera... if the aperture is the iris that moves larger or smaller to allow more or less light in, the shutter controls HOW LONG the light comes in... and the sensor would be the brain capturing the image. As we know from previous lessons 3 things control your exposure. (How MUCH light, How LONG your sensor is allowed to see that light, and How SENSITIVE your sensor is to that light)

So, why would you want to control the amount of time your camera sees a scene?
Have you ever taken an image of someone waving? Was their hand blurry or clear? This has everything to do with your shutter speed.
TIP: Shutter speed is measured in seconds – or in most cases fractions of seconds. The bigger the denominator the faster the speed (ie 1/1000 is much faster than 1/100).
A shutter speed of 1/100th of a second is better for shooting HIGH speed, such as action, sports, waving hands... because it stops the action.. it is open for such a small amount of time that it appears you have frozen the movement.Where if you take the same image with a shutter speed of 1/100 it could still appear blurry.
Here is my fan this morning... as you can tell the blades are moving along at a pretty good clip, seeing as how its already above 80 and its not quite 7am yet.
Note: The yellow is due to not using a flash. The light available from the ceiling fan is simply producing the yellow light, I choose not to WB or adjust anything else so we would have a baseline image as we move forward.
Now it looks like the fan is turned off, right? It's not! My shutter simple opened and closed so fast that it "froze" that action.
So when would you use Shutter Priority?
When you want to stop action... such as sports, cars moving, babies moving, birds in flight, butterfly or humming bird wings... these are all calling out for a high shutter speed.
When you want to SHOW movement. Crazy idea, right? But think about it... what is the most beautiful image of a waterfall? The one where its all blending together and looks magically smooth... That's done by blurring the motion, leaving the shutter open for a longer amount of time. What about shooting your holiday photos? What if you want to show that the hummingbird was really flying when you took the image? You want it to be clear, but the wings to show motion. It helps to tell your story.
Now, this is where things get tricky... the longer you leave the shutter open the more things can go wrong for you. Even if you can hold your hands steady, you might pick up what is called motion blur or camera shake, from you breathing or moving the camera ever so slightly. The solution. TRIPOD or MONOPOD. If you plan on doing long shutter photography, like night skys, lighting or even holiday lights, putting your camera on a steady surface and not touching it is your friend!
With the 4th of July coming up.... I bet you know why this was on my mind! FIREWORKS, Baby! Controlling your shutter means you can show the movement in the fall! But remember, a TRIPOD needs to be used so you don't blur the image by holding your camera!


I have talked about some other modes to use to control your shutter, but we haven't really dived into "S".
So, what is Shutter Speed.
Simple. It is the speed at which your shutter opens and closes.
Perhaps the better question to start with is What is a Shutter?

The shutter sits between your lens, and your film... or your sensor chip these days. It moves out of the way opening to expose the sensor to your scene and thus creating your image. How long that shutter stays open has a direct effect on exposure of your image. I like to think of the shutter as the eyelid of your camera... if the aperture is the iris that moves larger or smaller to allow more or less light in, the shutter controls HOW LONG the light comes in... and the sensor would be the brain capturing the image. As we know from previous lessons 3 things control your exposure. (How MUCH light, How LONG your sensor is allowed to see that light, and How SENSITIVE your sensor is to that light)

So, why would you want to control the amount of time your camera sees a scene?
Have you ever taken an image of someone waving? Was their hand blurry or clear? This has everything to do with your shutter speed.
TIP: Shutter speed is measured in seconds – or in most cases fractions of seconds. The bigger the denominator the faster the speed (ie 1/1000 is much faster than 1/100).
A shutter speed of 1/100th of a second is better for shooting HIGH speed, such as action, sports, waving hands... because it stops the action.. it is open for such a small amount of time that it appears you have frozen the movement.Where if you take the same image with a shutter speed of 1/100 it could still appear blurry.
 |
| Shutter Priority setting 1/100 |
Note: The yellow is due to not using a flash. The light available from the ceiling fan is simply producing the yellow light, I choose not to WB or adjust anything else so we would have a baseline image as we move forward.
 |
| Shutter Priority setting 1/1000 |
Now it looks like the fan is turned off, right? It's not! My shutter simple opened and closed so fast that it "froze" that action.
So when would you use Shutter Priority?
When you want to stop action... such as sports, cars moving, babies moving, birds in flight, butterfly or humming bird wings... these are all calling out for a high shutter speed.
When you want to SHOW movement. Crazy idea, right? But think about it... what is the most beautiful image of a waterfall? The one where its all blending together and looks magically smooth... That's done by blurring the motion, leaving the shutter open for a longer amount of time. What about shooting your holiday photos? What if you want to show that the hummingbird was really flying when you took the image? You want it to be clear, but the wings to show motion. It helps to tell your story.
Now, this is where things get tricky... the longer you leave the shutter open the more things can go wrong for you. Even if you can hold your hands steady, you might pick up what is called motion blur or camera shake, from you breathing or moving the camera ever so slightly. The solution. TRIPOD or MONOPOD. If you plan on doing long shutter photography, like night skys, lighting or even holiday lights, putting your camera on a steady surface and not touching it is your friend!
With the 4th of July coming up.... I bet you know why this was on my mind! FIREWORKS, Baby! Controlling your shutter means you can show the movement in the fall! But remember, a TRIPOD needs to be used so you don't blur the image by holding your camera!

Happy 4th and Happy Shooting!!!!
Subscribe to:
Posts (Atom)